*FYI - this post may contain affiliate links, which means we earn a commission at no extra cost to you if you purchase from them. Also, as an Amazon Associate I earn from qualifying purchases. Check out our Privacy Policy and Disclosure. for more info.
If you’ve ever dreamt about gliding through the jawdropping landscapes of Switzerland on trains both pristine and punctual, this realistic and (brutally) honest guide is for you.
Because train travel in Switzerland is an absurdly dreamy experience… even in spite of its not so dreamy prices.
But before you can ooh and ahh your way past snow-dusted peaks shaped like your favourite chocolate, there are several confusing hurdles for first timers to conquer. From demystifying ticket types and savings passes to combing through all the different company names and operators, things get overwhelming quickly.
You’re in the right place though! Swiss train travel happens to be one of my favourite niche topics. And after several rail-reliant Switzerland trips of my own over the past ten years, I’m finally ready to share this simplified guide based on my own experiences and mistakes.
So, read on for a step by step guide on how to travel Switzerland by train, with years of condensed wisdom and hidden tricks like FREE tickets, secret savings, and more. I hope you find it helpful!
Save this guide on how to travel Switzerland by train for later!
You’ll be very glad you did.
A Brief Introduction to the Swiss Train System
Let’s start with a quick summary of just how epic Switzerland’s train system is… because I need to get this fangirl energy out of my system. Cue some dramatic music for this please.
With a railway network spanning over 5200km and more than 1800 stations, Switzerland is home to one of the densest rail networks in the world, with more kilometers of train travel per inhabitant than any other European country.
But not only is their network extensive, the trains are painfully punctual, consistently clean, and effortlessly efficient, making it a true dream for train loving tourists/nerds like you and me.
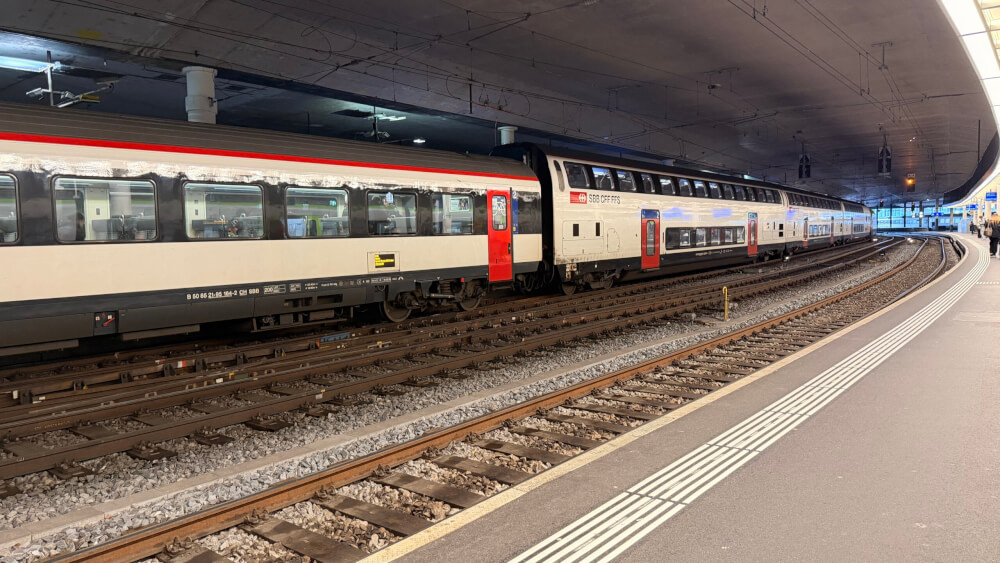
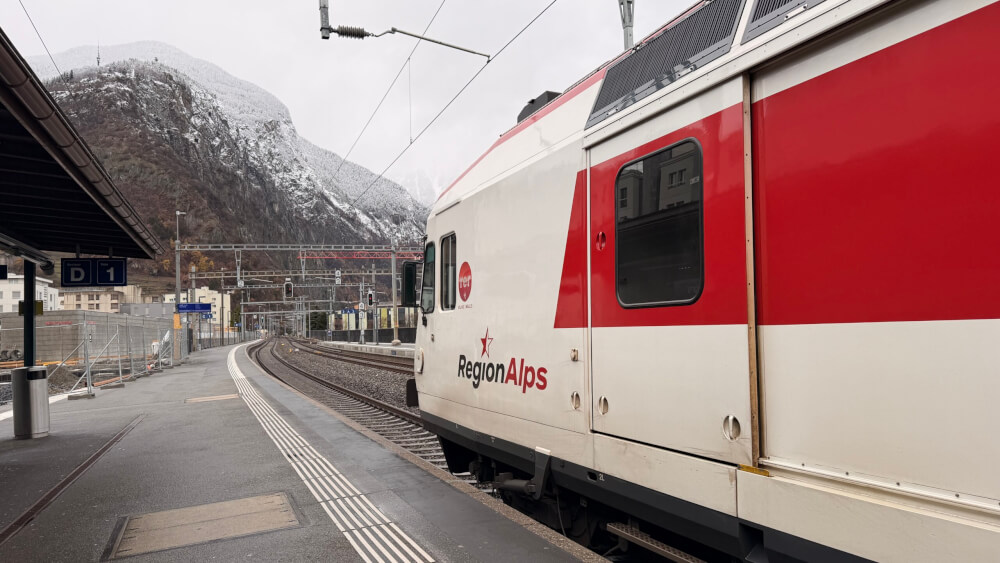
Who do we have to thank for this? Well, a majority of the Swiss rail network, over 3200km, in fact, is operated by the Swiss Federal Railways, confusingly abbreviated as SBB CFF FFS, which covers the name of the company in three languages*: German (Schweizerische Bundesbahnen), French (Chemins de fer fédéraux suisses) and Italian (Ferrovie federali svizzere).
There are, however, over 70 railway companies that service the entire Swiss network, which is why you’ll see many different names and logos depending on where you are.
*NOTE: SBB is the abbreviation most commonly used in English, so I will henceforth just call it SBB for brevity sake. It’s also the name they use for their amazing app – SBB Mobile.

All these names and operators may seem confusing at first glance, but a few factors make it simpler.
First – fares in Switzerland are generally fixed on distance, so you can hop on any train along that route and it should cost the same regardless of the provider or train type (in most cases). Because of this, you don’t need to stress too much about the various operators or train types available in Switzerland, though there are many, including…
- Longer distance trains like the InterCity (IC) and InterRegio (IR) trains connecting larger cities and towns
- Shorter distance trains servicing shorter routes with more stops like the Regio (R) trains or S-Bahns that connect suburban areas with city centres
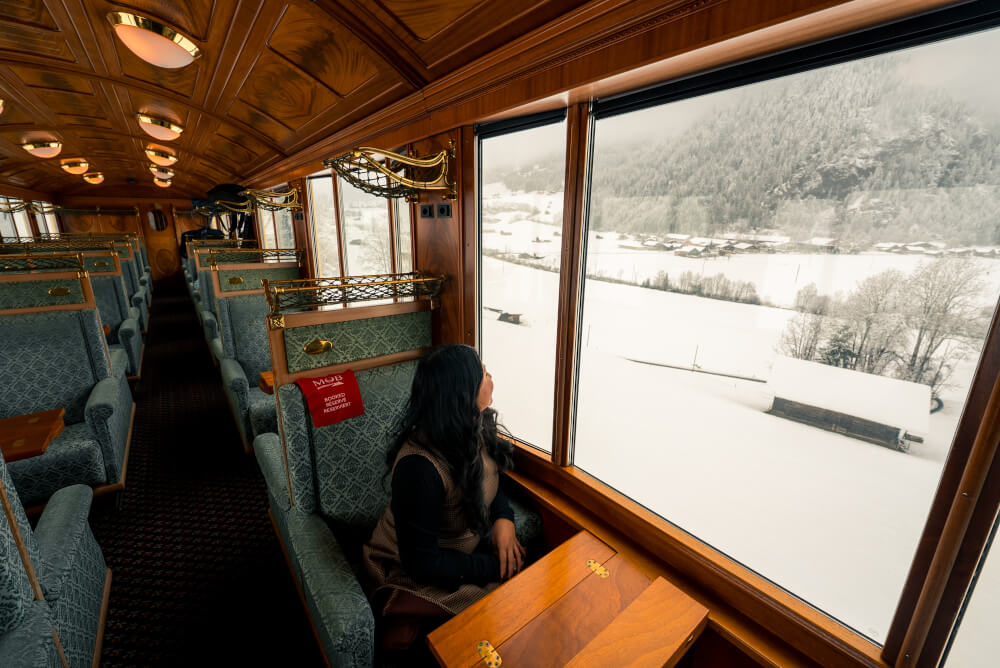
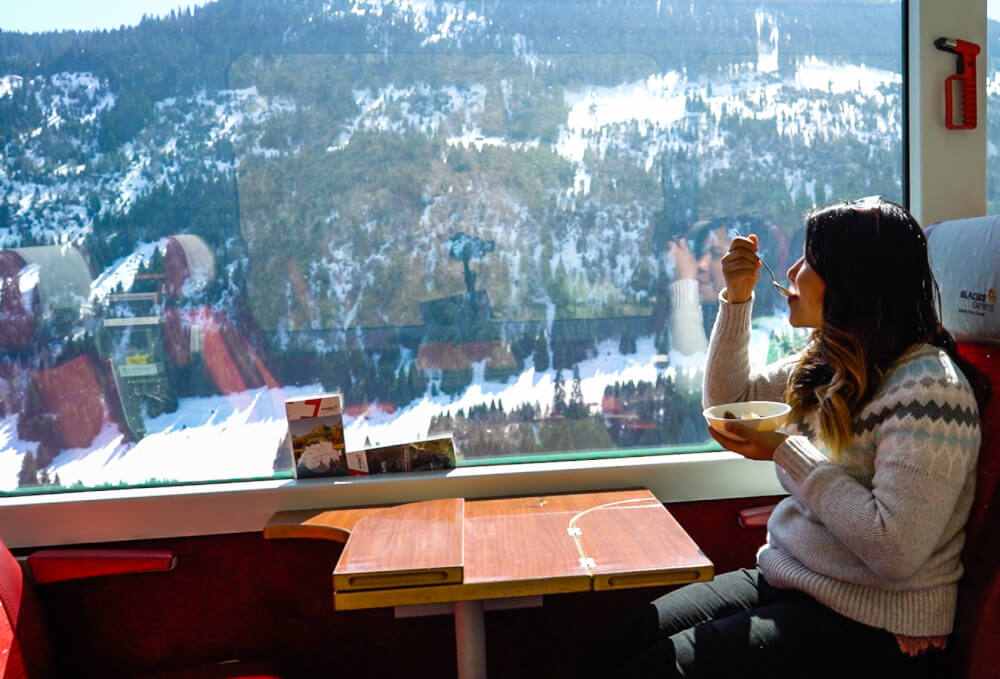
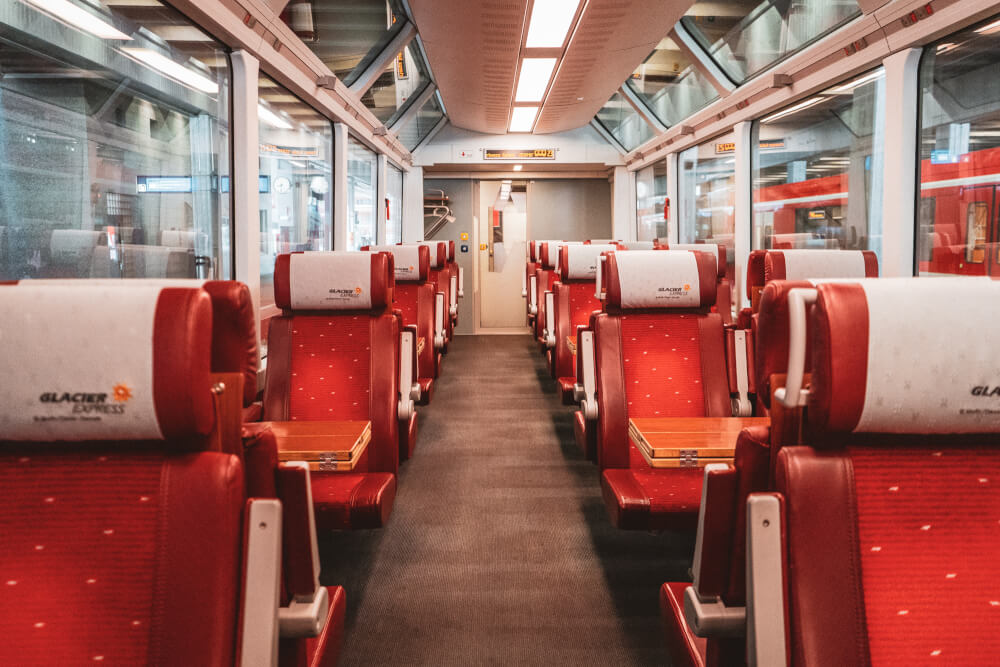
- Panorama Express (PE) trains designed for sightseeing, usually with bigger windows and tourist amenities. These will typically cost more because of mandatory reservation fees, but the base fare is the same. In fact, many normal trains service these same routes with the same views for cheaper, so keep that in mind if budget is a priority.
- Special experience trains, especially mountain ones like funiculars or cogwheel trains, and heritage steam trains

Second – with the exception of some special tourist-oriented trains that require special reservations or bookings, most train operators do sell tickets through the SBB website and app as well, meaning you can reliably search with SBB and see all the options at a glance.
So yes, the Swiss train system is a marvel – a mildly confusing marvel, but a marvel nonetheless!
With those basics out of the way, I think we’re ready to move onto the step by step portion of this guide, starting with…
Step One: Decide if Train Travel in Switzerland is Right for You
As I’ve said before, Switzerland is definitely one of the dreamiest countries to travel by train, but sadly, much like breathing or simply existing in Switzerland, it is expensive.
So before you jump in, do first reflect on whether or not there are better choices suited to your needs.
I do genuinely think trains are probably the best option for most travellers, unless your main goal in Switzerland is to do a lot of hiking in more remote areas, in which case having a car might be useful.
Or alternatively, if you’re not covering a lot of ground and your main priority is budget, opting for bus travel instead might save you money. In fact, many cities and regions will give you a guest card that covers free public transport in the area when you stay overnight, which is great for local exploration.
For longer distances, if you’re not sure about the cost differences between trains and other modes of transport, one app I love for this is Omio, which shows you planes, trains, and buses from Point A to Point B.
But generally speaking, train travel in Switzerland is great if you’re looking for convenience, comfort and scenery.
If/when you’ve decided you do indeed want to take the train, then we move onto…
Step Two: Buy Your Switzerland Train Tickets or Passes
I’m gonna be real with you and say that buying train tickets in Switzerland can be VERY confusing if you’re new to it… especially if you’re trying to compare prices and get the best deal. But I’ll give you the simplest breakdown I can.
Before I get into all the details though, there is a really easy method you can use that’s ideal if trying to figure out train tickets is not your idea of fun. And most first-timers don’t know about it!
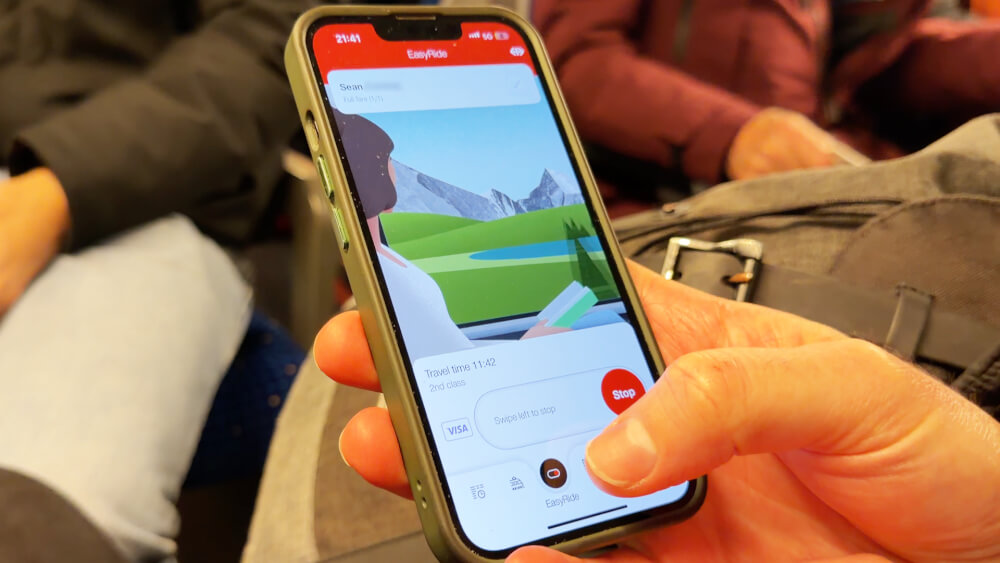
So just FYI, there’s a really cool feature of the SBB app called EasyRide that basically calculates the best deal for you at the end of the day – all you have to do is swipe once to start your journey, and swipe again to end your journey.
I got Sean to test this on our latest trip and it worked flawlessly, and if ticket inspectors come by you just show them your ongoing journey on the app and you’re good.
Another app, Fairtiq, which apparently powers Easyride, does the exact same thing, but some say Fairtiq is more reliable – honestly, just choose whichever one you prefer the look of.
… but while EasyRide and FairTiq are great for finding the best deal on full price tickets purchased the day-of, it’s not always going to be the most cost-effective option when you compare them to passes or ‘supersaver’ tickets purchased in advance.
To help you understand what might work best for your trip, let’s now continue with a discussion of the four main decisions you need to make when you’re buying train tickets in Switzerland:
- Point to point tickets vs passes
- 1st vs 2nd class
- Where to buy from
- Reserved vs unreserved seats
Consideration #1: Point to Point Tickets vs. Passes
The first decision you need to make is whether you want to just buy point to point tickets as needed, meaning separate tickets for every leg, or if you want to do things the simpler way and just buy a pass of some kind that covers you for a set region or duration.
As a reminder, generally speaking, regular point to point train tickets in Switzerland are fixed in price based on distance, meaning the price doesn’t change based on demand like it does in some other countries. There is also an unlimited number of regular tickets, meaning these tickets do not sell out.
IMPORTANT: With full price point to point tickets, you can take any train that day along your chosen route – and you can even break up your journey, getting on and off the train at any stop along the way, so long as you complete your journey before the end of the validity period. Used smartly, this can help you get more bang for your buck.
For those who can plan ahead though, there are other point to point tickets known as Supersaver fares. These are discounted tickets (up to 50% off!) tied to a specific train/departure time, and must be purchased BEFORE the day of departure. The catch is you are bound to that exact route and departure time that you bought for, which somewhat limits flexibility, and these tickets are limited in number, so can sell out.
Honestly, for most travellers, buying point to point supersaver tickets ahead of time will likely work out to be the most cost-effective option. Even point to point tickets at full price will probably be cheaper than a pass if you’re doing 1 or 2 big journeys here and there during your trip.
But if you plan to take many trains, especially the pricier tourist ones, and if you value the flexibility of not buying tickets in advance, then a pass might make sense.
The most low key pass that’s easy to make worth it is a Saver Day Pass.
It is as it sounds – you get to travel on the GA Travelcard area of validity for the entire day for one set price, which might make sense if you plan to take a lot of trains in one day (i.e. a long day trip). The exact price depends on the day and whether you book 1st class or 2nd, but it’s very clearly listed on the SBB Saver Day Pass page.
Much more expensive are other passes like the Holy Grail of Swiss tourist passes, the Swiss Travel Pass.
This monster of a pass includes…
- Free travel by train, bus and boat
- Free travel on panoramic trains (plus seat reservation and/or surcharge)
- Free use of public transport in over 90 Swiss cities
- Free entry to over 500 museums
- Included mountain excursions: Rigi, Stanserhorn and Stoos
- Up to 50% discount on other mountain excursions.
- Up to 30% discount on SBB RailAway offers
You can choose from two types of Swiss Travel Pass:
- Continuous for a set number of consecutive days, or
- Flex for a set number of days in a set time period
Both of these have 1st class and 2nd class options which, of course, means a confusing swirl of pricing and options.
Overall, if your priority is convenience, it doesn’t get easier than a Swiss Travel Pass. One pass and you have ease of mind because you’re covered for pretty much everything, and if you are a museum person, all those are included too.
But take note that the key selling point here really is convenience, because if you crunch the numbers, and I know this because I did, the pass is so pricey that you’d have to take a wild amount of trains per day and visit a shockingly nerdy number of museums to recoup the cost.
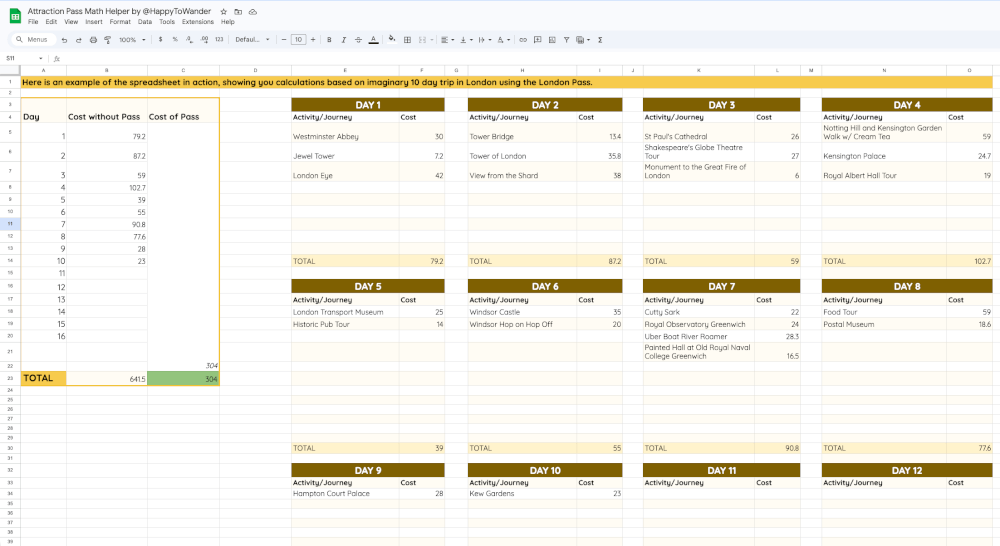
Again, the only way to know for sure is comparing the cost of the pass to the various point to point tickets and museum entries you’d want, so be sure to use the free Pass Math Helper spreadsheet in my VIP Zone for help with that.
If your travels are concentrated in a particular area, it might also be worth it to look into regional passes that cover transport in specific areas like the…
- Jungfrau Travel Pass
- Berner Oberland Pass
- Léman – Alpes Regional Pass
- Lucerne Travel Pass (formerly the Tell Pass)
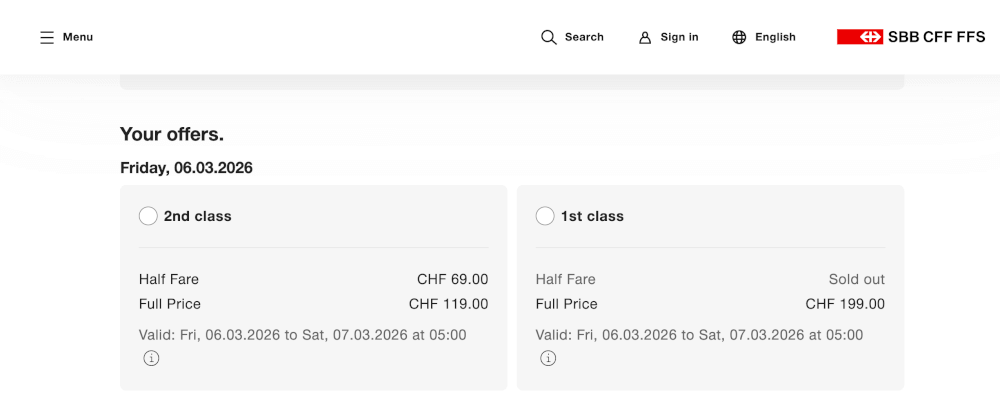
IMPORTANT NOTE: When doing the math to compare prices, be very careful. When you first search train prices in Switzerland, you might find that they’re not as bad as you expected… actually even affordable somehow? Don’t fall for it! THIS is a trap. Because very often, the first price they show you by default is the Half Fare.
Half fare rates apply to two groups: young people from 6-15 years old inclusive, and those who hold something called a Half-Fare Travelcard, or the tourist equivalent which is slightly cheaper – the Swiss Half Fare Card. This is a card that costs you 150 CHF for one month, but then entitles you to up to 50% discount on all journeys by train, bus, boat and most mountain railways, as well as public transport in 90+ cities.
In other words, if your trip is longer and you plan to take a lot of trains, this card could save you quite a lot of money.
Unfortunately, the only way to know if the Half Fare Card is worth it is (again) to do the math. Bearing in mind as well that all the aforementioned passes do also come with a half fare option as well, there’s plenty of math to be done. Enjoy!
For extended stays of at least 6 months, a GA TravelCard is another possibility – this is a card that gets you unlimited travel, but let’s be honest, most visitors won’t be staying that long.
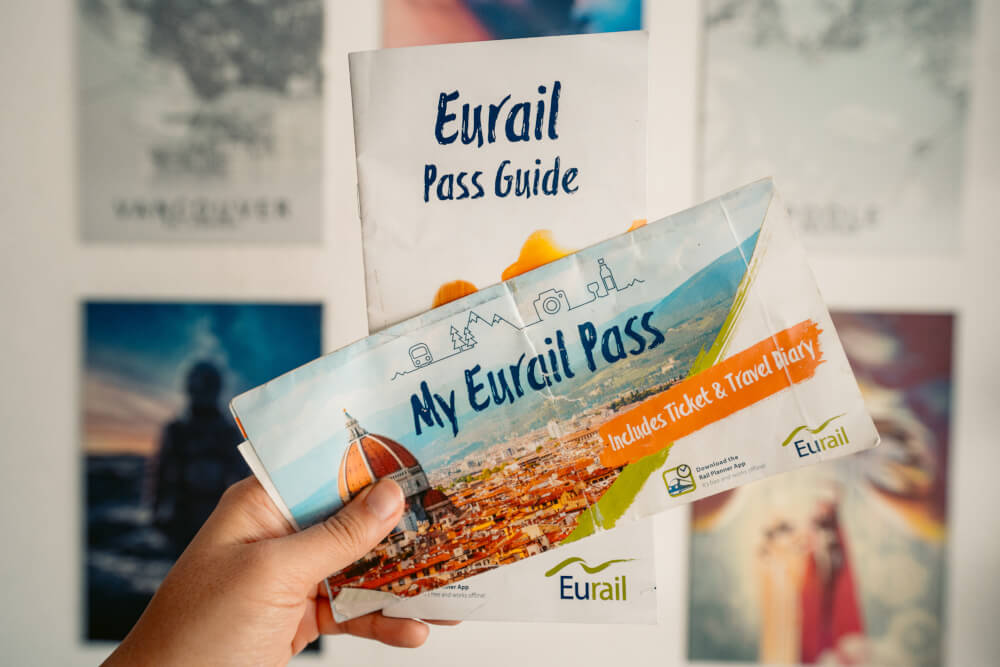
The last pass I’ll mention is the Eurail Global Pass.
If you are planning a longer trip that involves other countries this might be worth it because it is valid across over 30 countries.
Alright, exhale! That was a lot, but I hope the breakdown was helpful and not too confusing. We are finally onto the second consideration which is…
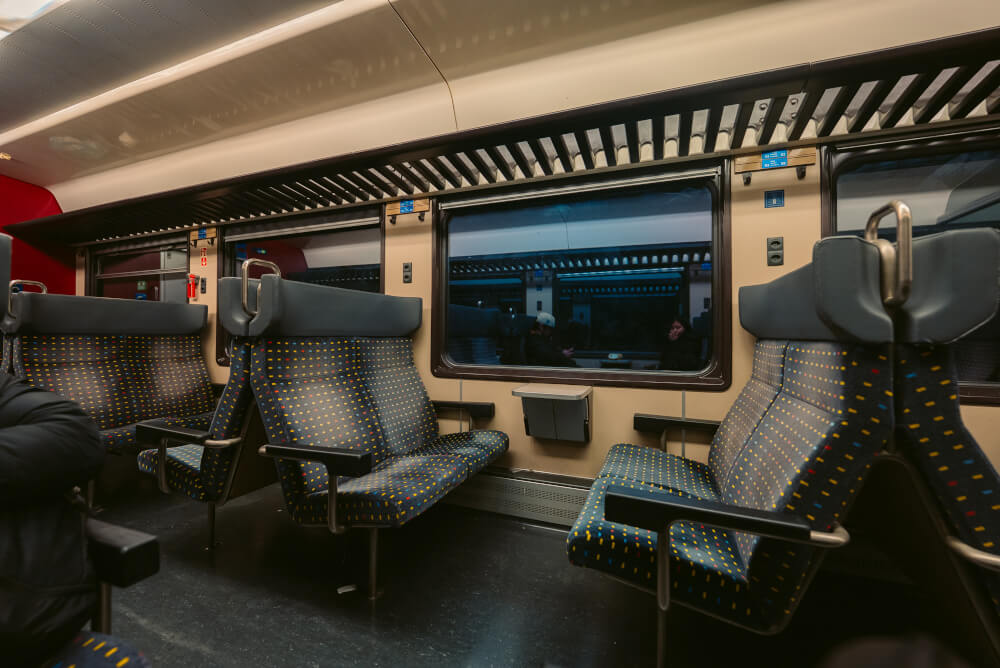
Consideration #2: 1st vs 2nd class
Pretty much every train ticket you buy in Switzerland – you can choose between 1st and 2nd class.
Honestly, trains in Switzerland are so pristine that second class is comparable to first class in other countries.
So, you are absolutely NOT missing out by booking 2nd class instead of 1st – the difference isn’t crazy dramatic… it will just be less crowded, the seats are slightly bigger and you’ll have a bit more space.
As a solo traveler, I do also appreciate that 1st class has single seat configurations available as well, but it’s not like 1st class is being served steaks and wine while 2nd class gets nothing – it’s again, not too dramatic a difference.
You even have the option to buy a 1st class upgrade on specific routes if you want – let’s say you have a 2nd class pass but you really want to experience 1st class for a day, or for just one ride, you can buy a class upgrade very easily online or through the SBB app.
On that note, once you’ve decided on the type of ticket and class you want, it’s time to move onto our next consideration which is…
Consideration #3: Where to Buy Tickets
Tickets for Swiss trains can be purchased either in person or online. I would highly advise booking online beforehand to minimize stress and save money.
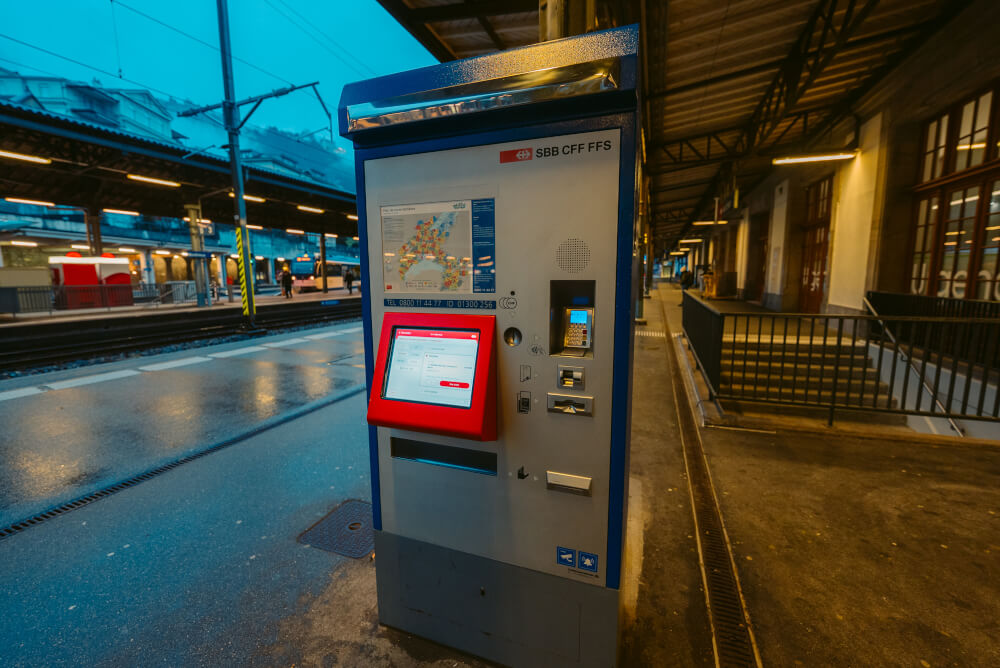
In person, you would typically buy your tickets from a digital kiosk, which allows you to switch to your language of choice very easily, but can be overwhelming for first-timers to navigate with all the different buttons and ticket types.
Online, you have two main options: buying directly from the train operators’ website or getting tickets through a 3rd party.
I have a full video that deep dives into the pros and cons of 3rd parties, but generally, if you are staying in Switzerland the entire trip, I would say book directly – this will be the cheapest because 3rd parties often add on a service fee, plus the SBB app is truly fantastic and easy to use.
IMPORTANT: Make sure you do create an account rather than check out every time as a guest, because any refunds on guest accounts incur a 10 CHF fee.
I would only maybe book with a 3rd party if you are doing a huge trip across multiple countries and want to keep all your train tickets in one app, but if the best price is the goal, stick with direct bookings.
For direct bookings, you can make those either on the SBB website, the swissrailways.com website (which is the official ticket shop run by SBB) OR through the official website of whichever company actually operates that train e.g. lthe RhB Rhaetian Railway.
This seems confusing, but in practice, the user experience on the SBB website is great and you won’t usually need to deal with individual operator websites unless you’re booking reservations for special trains.
I’ll quickly show you how to do it now!
So, even on the SBB front page you can search tickets up, so enter your departure point and destination then it’ll open up all these options. At this point, you can choose your date of travel, time, and most importantly, the price display.
As I mentioned before, the half fare is usually the default, so if you don’t plan to get a half fare card, make sure that full fare is checked off here.
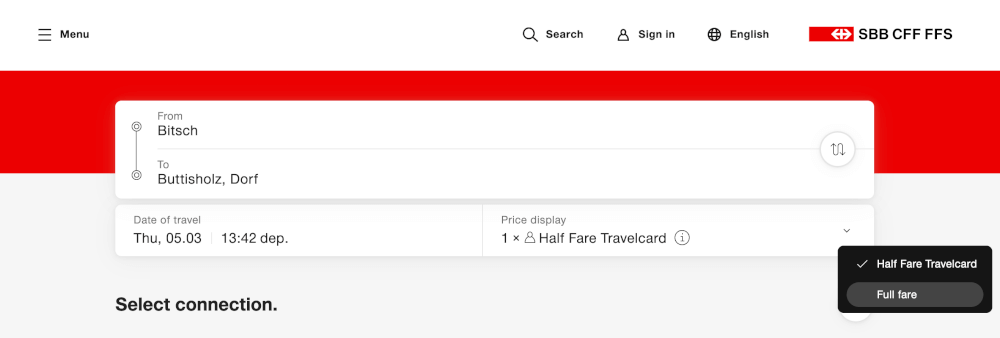
The list should update automatically once you change anything, and if you’re not picky you can just scroll through the options, keeping an eye out for the % sign which indicates a supersaver ticket is available in case you’re looking for deals.

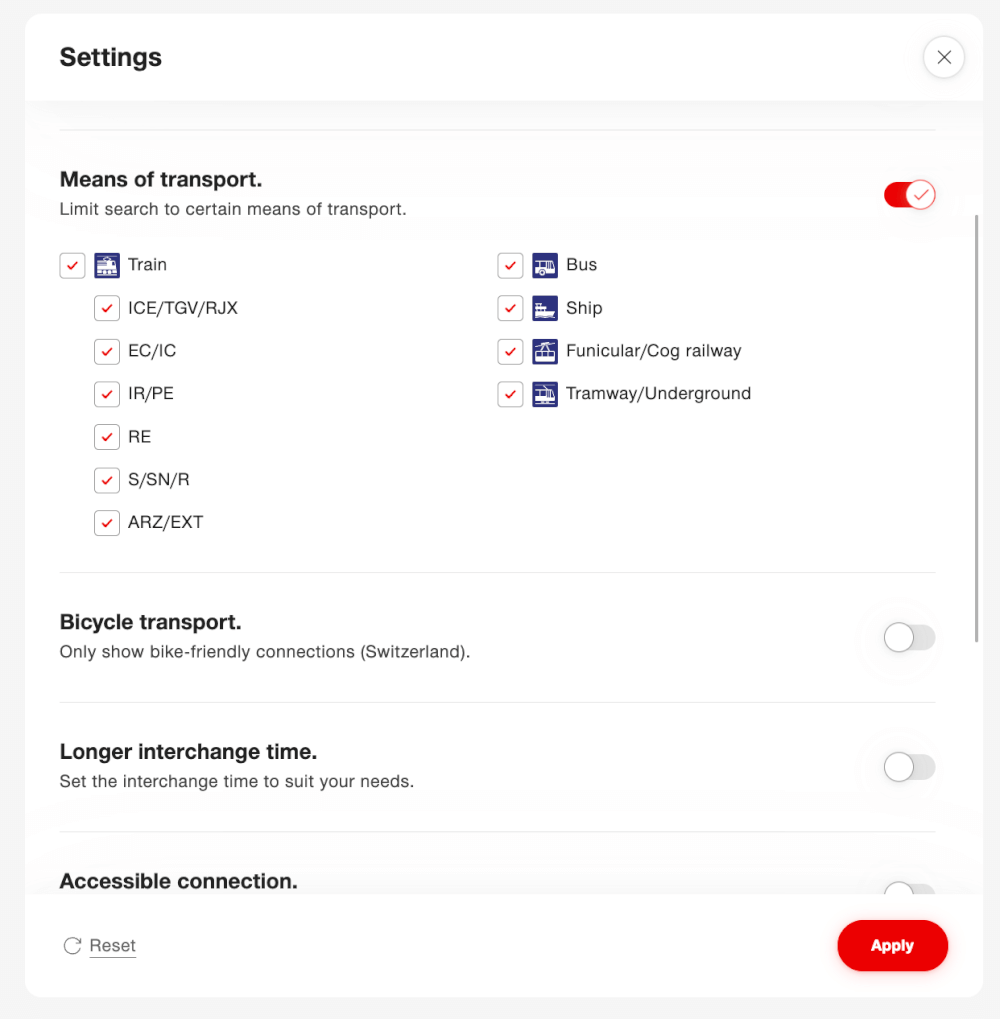
If you want to get super specific with your search parameters you can even click the button with the toggle switch icon and from there you can filter by transport type, bike-friendliness, accessibility, etc.
Again, remember that for full price tickets, the ticket is valid on that route for the whole day, so it doesn’t really matter which one you get.
BUT if you are going for a supersaver ticket, that ticket IS very much bound to the specific journey and time.
Now, once you’ve found the one you want, you go to Select Tickets.
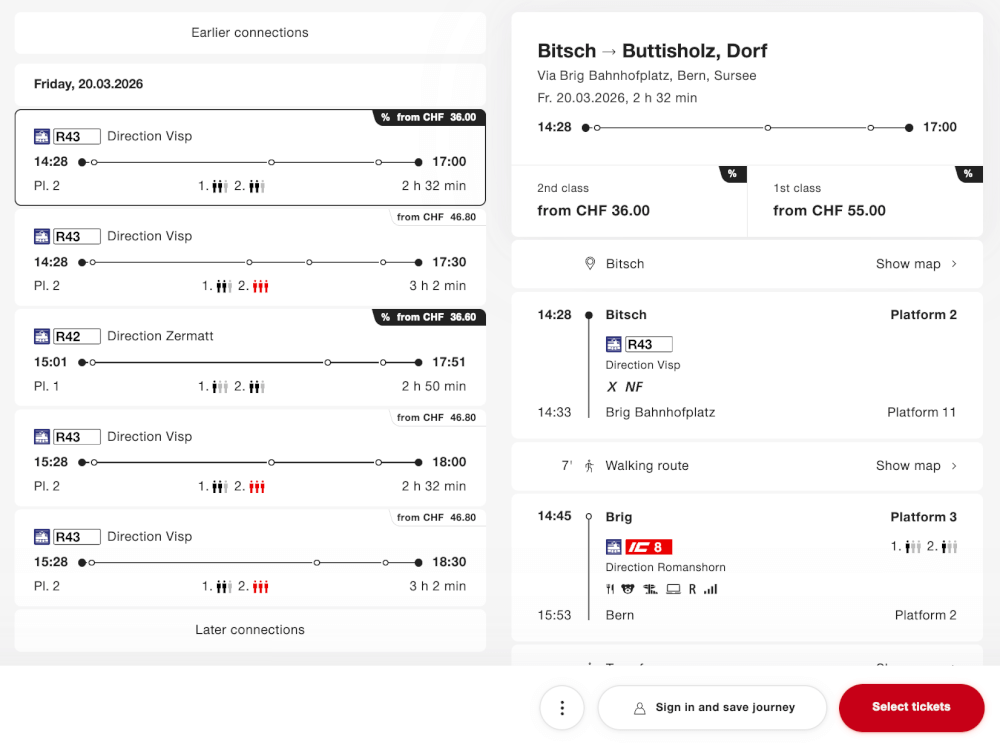
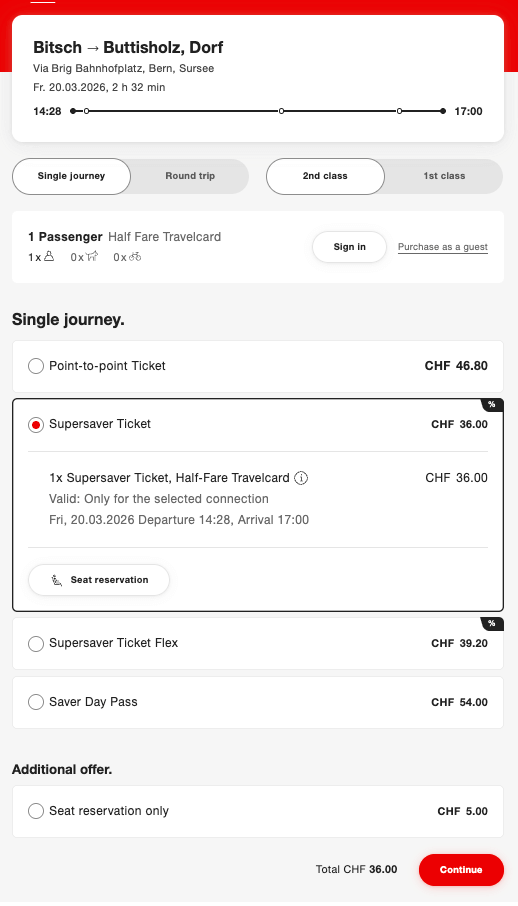
… and choose from there which ticket you want, the full price one that is valid on that route all day, or the Supersaver one bound to that journey.
There’s a slightly pricier Supersaver Flex option as well that lets you get a refund on the ticket before departure.
And also a Saver Day Pass if you wanna go for the whole day and have unlimited rides for the day.
NOTE: You can also pay for a ‘Seat Reservation Only’ for CHF if you have a pass or already bought your regular ticket, and all you want to do is reserve a seat for your journey. Do note that this is just a reservation, and you will still need a valid base fare for when inspectors come along (more on this later).
You will then be prompted to sign in or make an account. Again, I would recommend you just make an account because then you can easily request refunds without an extra charge ,and it just keeps things a little simpler as well for future purchases, because then your info is already all saved.
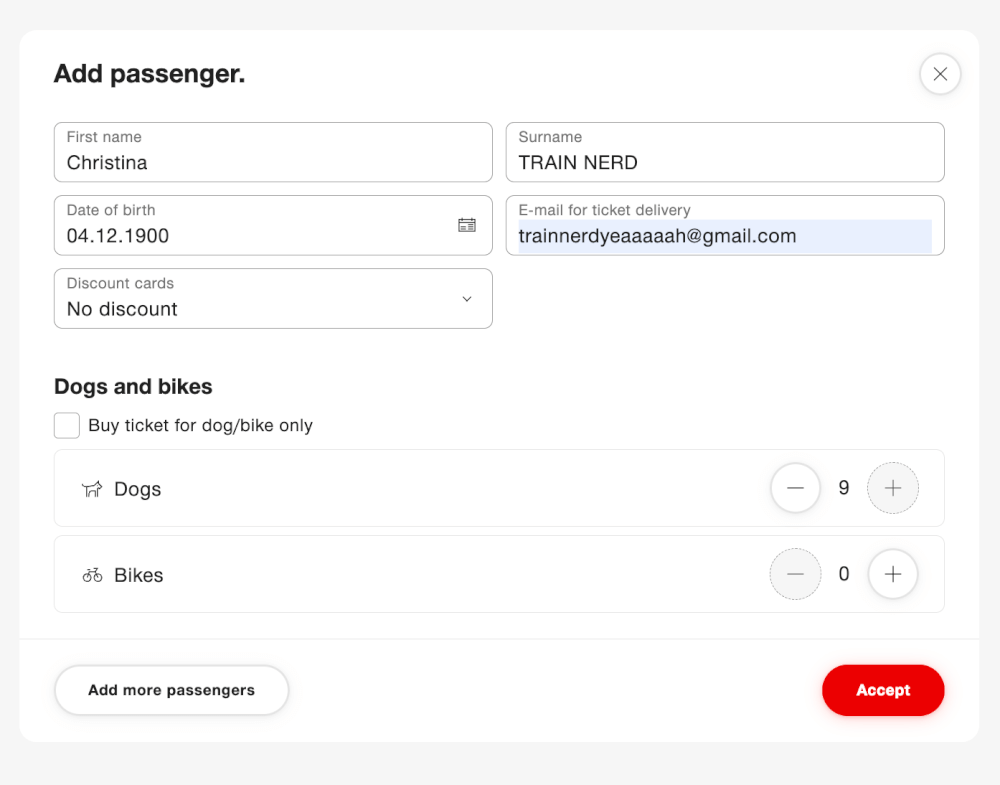
Once you’re signed in, you enter your info and any discount cards you might have, check off if you’re bringing any dogs or bikes as this costs extra and then check out by entering your payment details.
And that’s it! Pretty simple if you’re just buying regular point to point tickets, and the process is very similar on the app as well.
For passes, you would go to the specific pass website, or again swissrailways.com for things like the Swiss Travel Pass or Swiss Half Fare Card.
These passes are usually available on 3rd party sites as well like GetYourGuide and Klook. If you have coupons, sales, or cashback offers on these sites, sometimes you can get them even cheaper than buying direct, but otherwise, the cost is quite similar.
I still generally prefer to book direct when possible but it never hurts to check all the options if you’re looking for the best deal.
If you are set on buying direct though, do note though that many 3rd parties are cleverly branded to look quite official, and it’s easy to accidentally buy tickets from a tour operator or travel agency.
If this happens, don’t worry, it isn’t the end of the world, if it’s a reputable agency then the tickets will still work, but booking direct is usually best for customer service and the lowest possible price, so try your best to make sure you’re actually on an official website.
Finally…
Consideration #4: Reserved vs Unreserved Seats
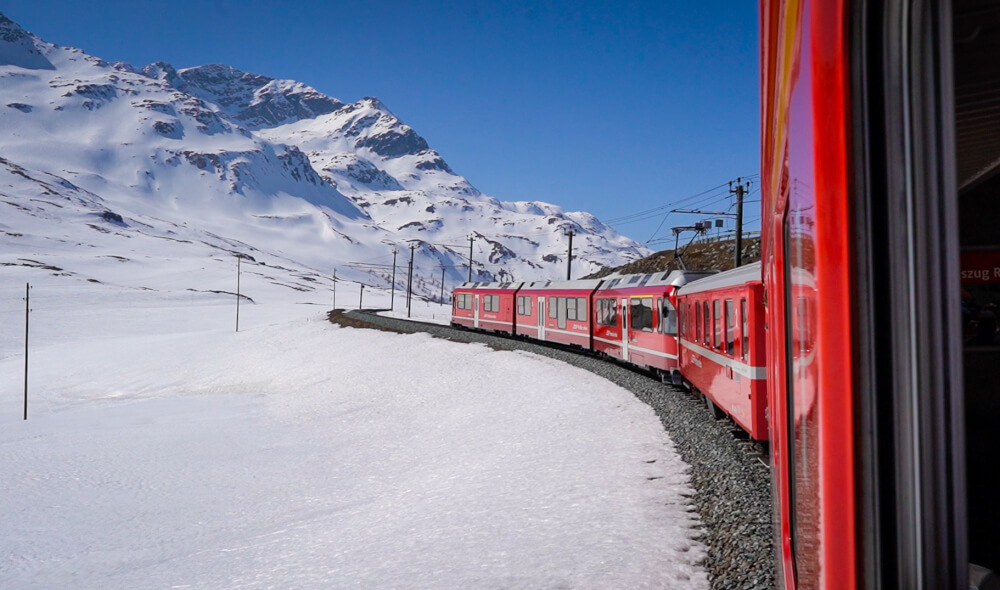
Most trains in Switzerland do not require reservations. The only notable exceptions are the tourist-oriented scenic trains where a reservation is mandatory, like the Glacier Express, Bernina Express, and Gotthard Panorama Express.
If you are desperate to secure a seat though (e.g. if you are travelling during a peak time and want to guarantee you have somewhere to sit), then this will cost you CHF 5 for regular trains. On the longer distance trains where they have one, you can make reservations for the dining car as well, so that might be a nice experience.
The catch that is very, very, very important to note is this: in Switzerland, reservations and base fare tickets are booked separately.
This means if you have a reservation, your ticket is essentially in two parts: the base fare and reservation fee.
I have witnessed first-hand how this catches first-timers off guard because they might buy a reservation and think that’s their ticket, when that ticket is, in fact, only for your reserved seat and not for the train ride itself.
So again, if your ticket seems suspiciously cheap, it’s very possible that you bought a reservation, and not the actual ticket. Make sure to read the confirmation fully to understand which you have.
This is especially important on tourist trains like on the GoldenPass line or the Glacier, Bernina and Gotthard Panorama Express trains.
Lastly, if you are travelling with a bike or with a pet, know that there are add-on tickets you must buy for them to board.
Now before we move on, I’m gonna just share a few more…
Tricks for saving money on tickets
First – Switzerland is an amazing country to have your birthday in because they give you a lot of free stuff, including select mountain excursions like a free ride on the Niesenbahn, or a free cableway trip from Stechelberg or Mürren to the Schilthorn and back!
Or if you want to take one of my absolute favourite rides of all time for free, MOB offers a free 1st class day pass on your birthday so you can ride the Golden Pass Belle Époque and others for free.
Age-wise, if you are under 25, you will qualify for some discounts as well, from special travelcards to free rides if you’re under 6, and 50% off if you’re between 6 and 16.
You can also look into Explore’n’Rail tickets to save money for attractions and day trips too. They have tons of options that give you some savings when you combine train travel with admission to attractions or activities.
Alright, with your tickets booked it’s time to move onto the day of your journey, with…
Step Three: Get Snacks
Before heading to the station, I highly recommend making sure you have some snacks or drinks to bring with you on the train.
Eating and drinking is allowed in most trains, and while some longer intercity ones will have a dining car with options for food to buy, they can often be pretty expensive or lackluster.
At the very least, make sure you have water or something to drink, in case you’re hit with a delay (though it’s Switzerland, so this is unlikely).
As I mention in my Switzerland travel tips video, the best budget-friendly grocery stores in Switzerland are Aldi and Lidl or Denner. Some good deals can be found at other stores though if you look for the store brands like M-Budget at Migros or Prix Garantie at Coop.
Be sure to check out my full Switzerland tips guide for more info.
There are usually also options at the train station too, but I find it less stressful to just have something in advance.
Now, let’s move onto…
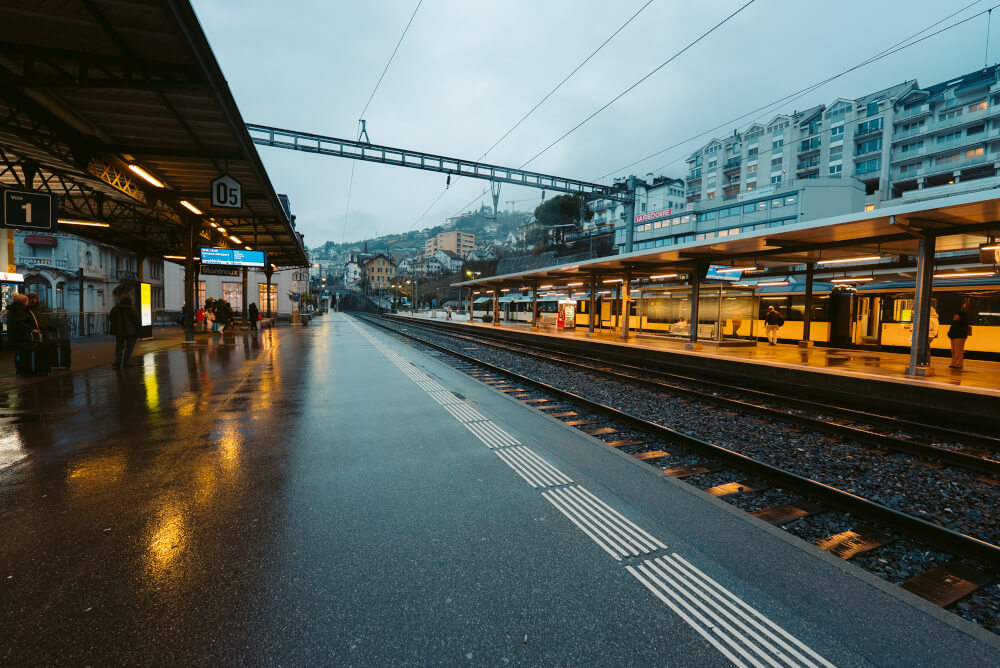
Step Four: Arrive at the Station
First off, before leaving, do double-check that you are headed to the right station. Many major cities will have multiple stations, which can cause confusion.
Now, if it’s your first time at this station, I recommend you arrive thirty minutes or more in advance of your departure time. Some of the bigger stations in Switzerland can be massive and confusing, like Zurich HBF which has 26 tracks spread across different sections.
If you’re really nervous though, something I find super cool about Swiss train stations is they have really robust station maps available online so you can easily preview where you need to go, or at least get your bearings a bit before departure.
Now, if you are taking public transport and arriving at the train station in a big city, you might find it tough to find where the trains actually are, because often these stations are multi level transport hubs servicing metros, trams and buses as well.
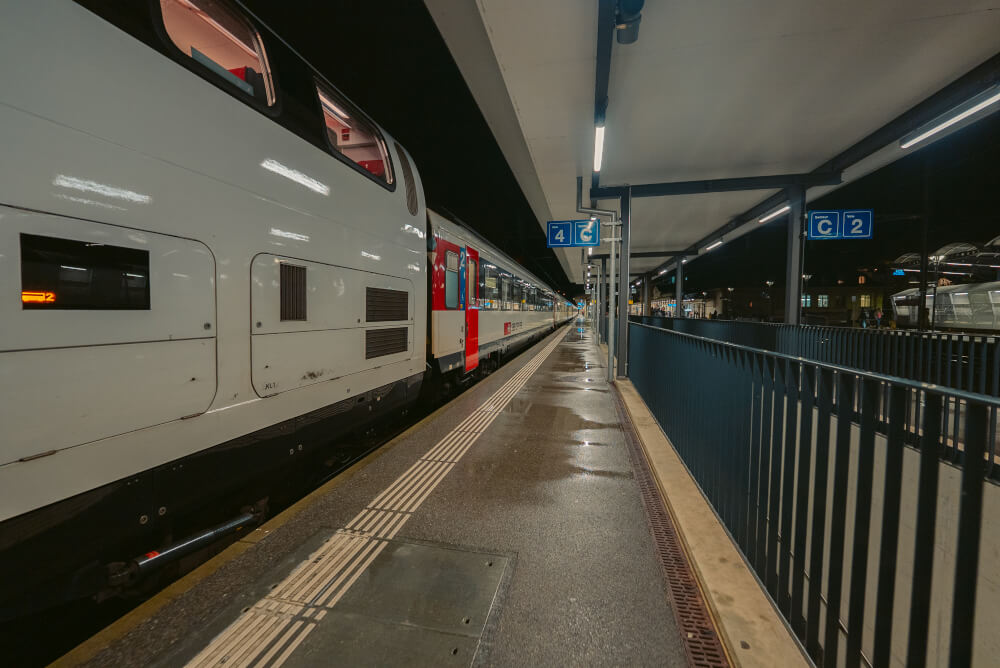
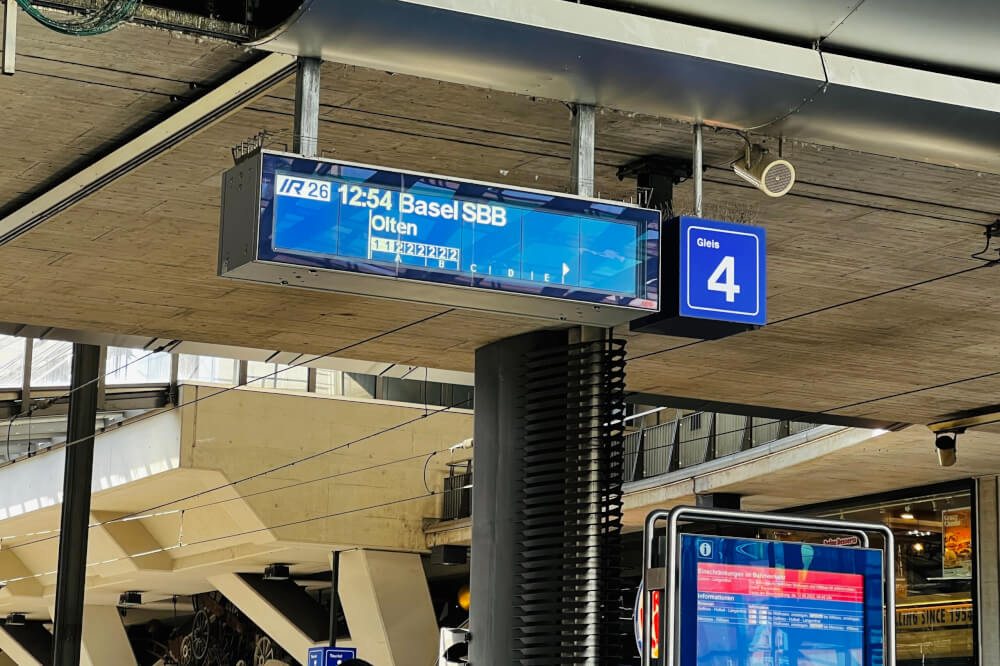
In any case, all you need to do is look for signs with a number on them which point towards the platforms of that number.
On that note, when you get to the main concourse of the train station, your priority is finding out which platform your train is on.
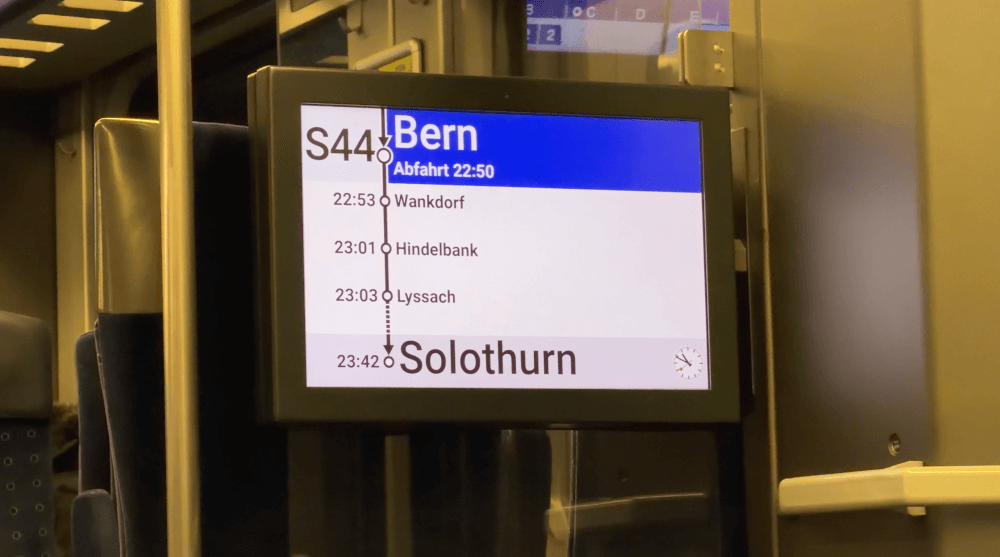
These days the SBB app is pretty good about telling you which platform to go on, but I always like to cross reference with the big board just in case. Luckily, unlike some other (more stressful) countries that tell you platform details last minute, usually platform info in Switzerland is available quite far in advance.
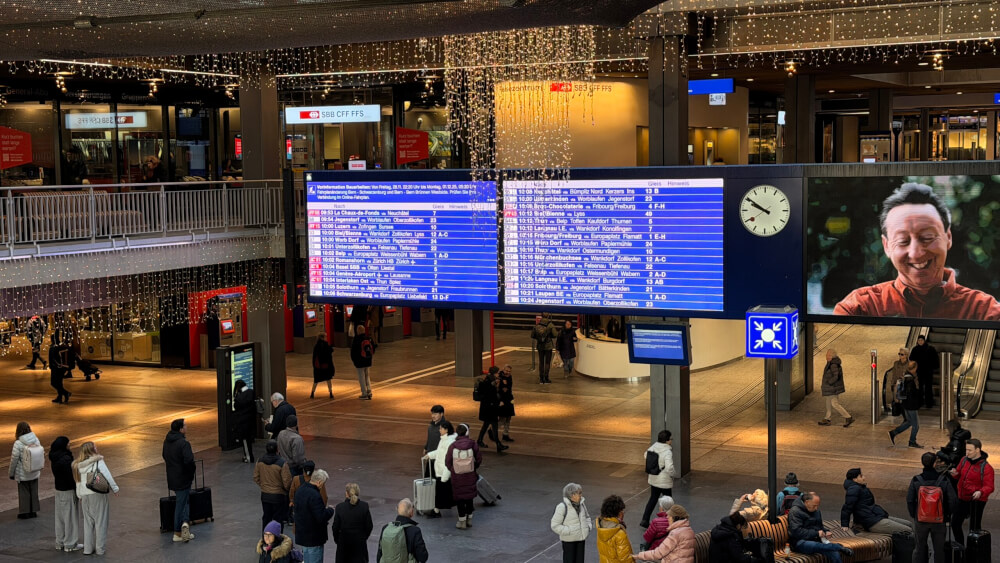
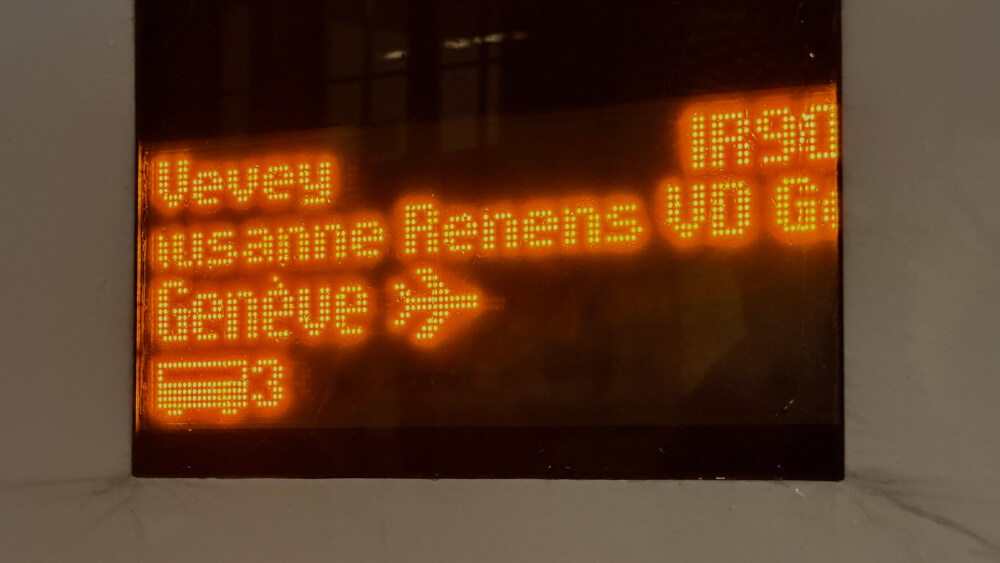
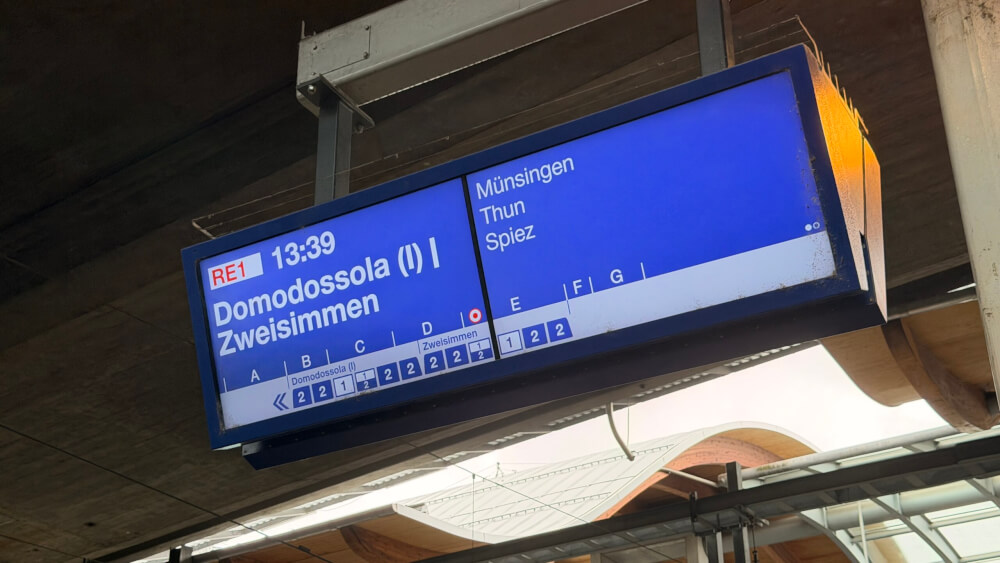
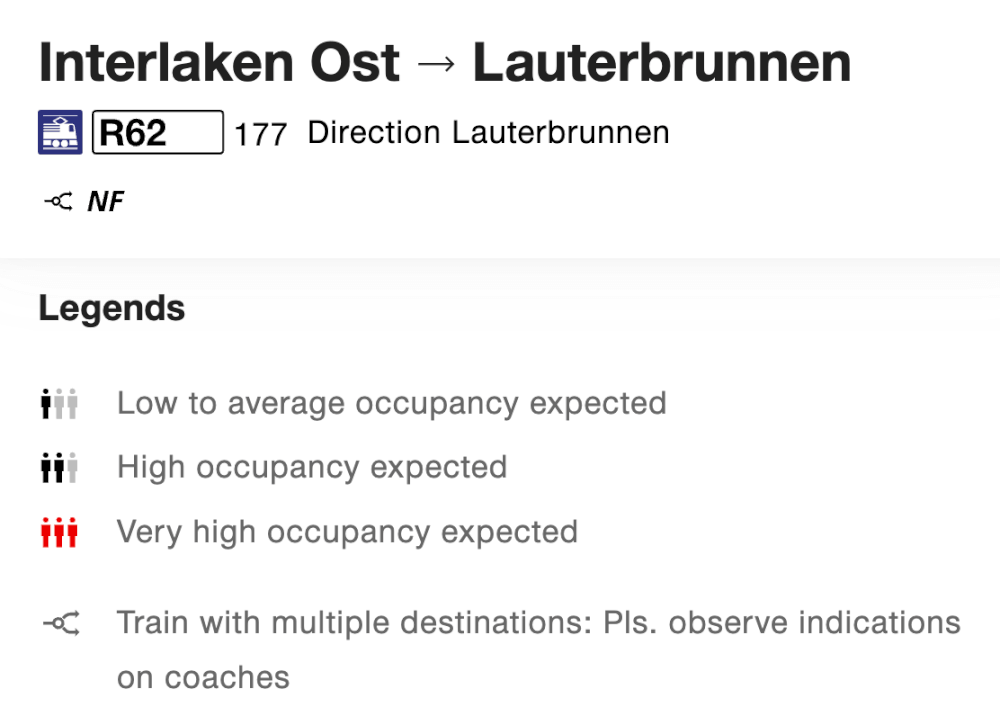
Do remember though that trains on this board will not necessarily say your destination, but rather usually the final destination of the train, so if you don’t see the name of where YOU’RE travelling to, don’t panic.
Look for the time and train number. The final destination of that train will be displayed in bold, then to the right (after “via”) you should see the other main stop names… including (hopefully) yours!
NOTE: In addition to knowing the name of your destination in English, be sure to know its name in any local language(s) as well, because this is typically the name that will be shown on the boards/sides of the train… like Luzern instead of Lucerne as it’s known in English.
In Switzerland, sometimes the name will be shown in multiple languages like with bilingual cities such as Biel/Bienne, but most of the time they go by the name of the city as it is known in the destination.
Aother one to look out for is airport in the local language, so if you’re going to the airport in Zurich for instance, where the main language is German, you’d look for Flughafen. If you’re going to the airport in Geneva, where the main language is French, you’d look for Aéroport.
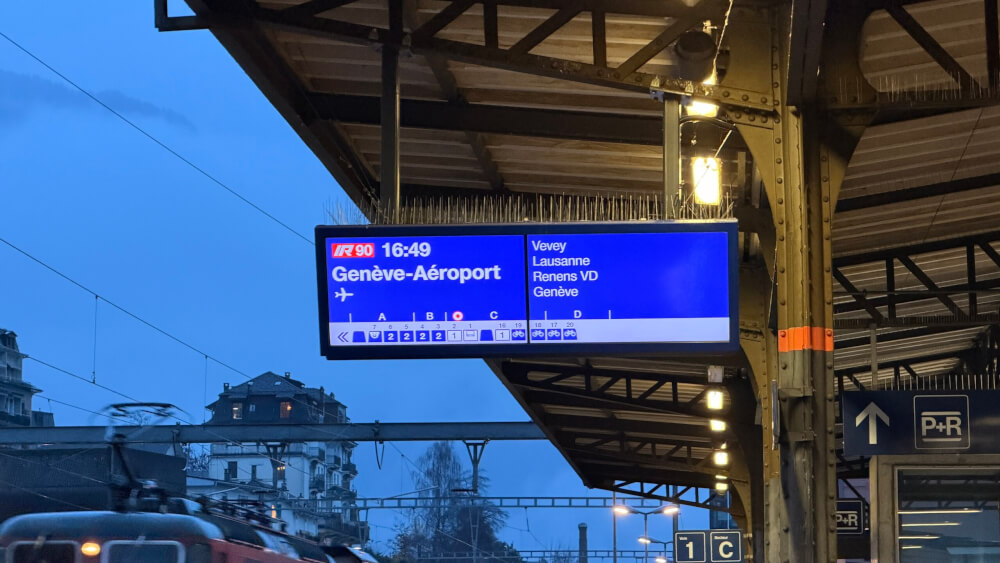
IMPORTANT: If your platform is listed with a letter alongside the number (either on the board or in the SBB app) do NOT ignore this letter because a) some larger train stations have more than one train arriving on the same platform sometimes, so you might end up on the wrong train and b) sometimes they tell you the letter to prevent you from getting on the wrong carriage of a splitting train.
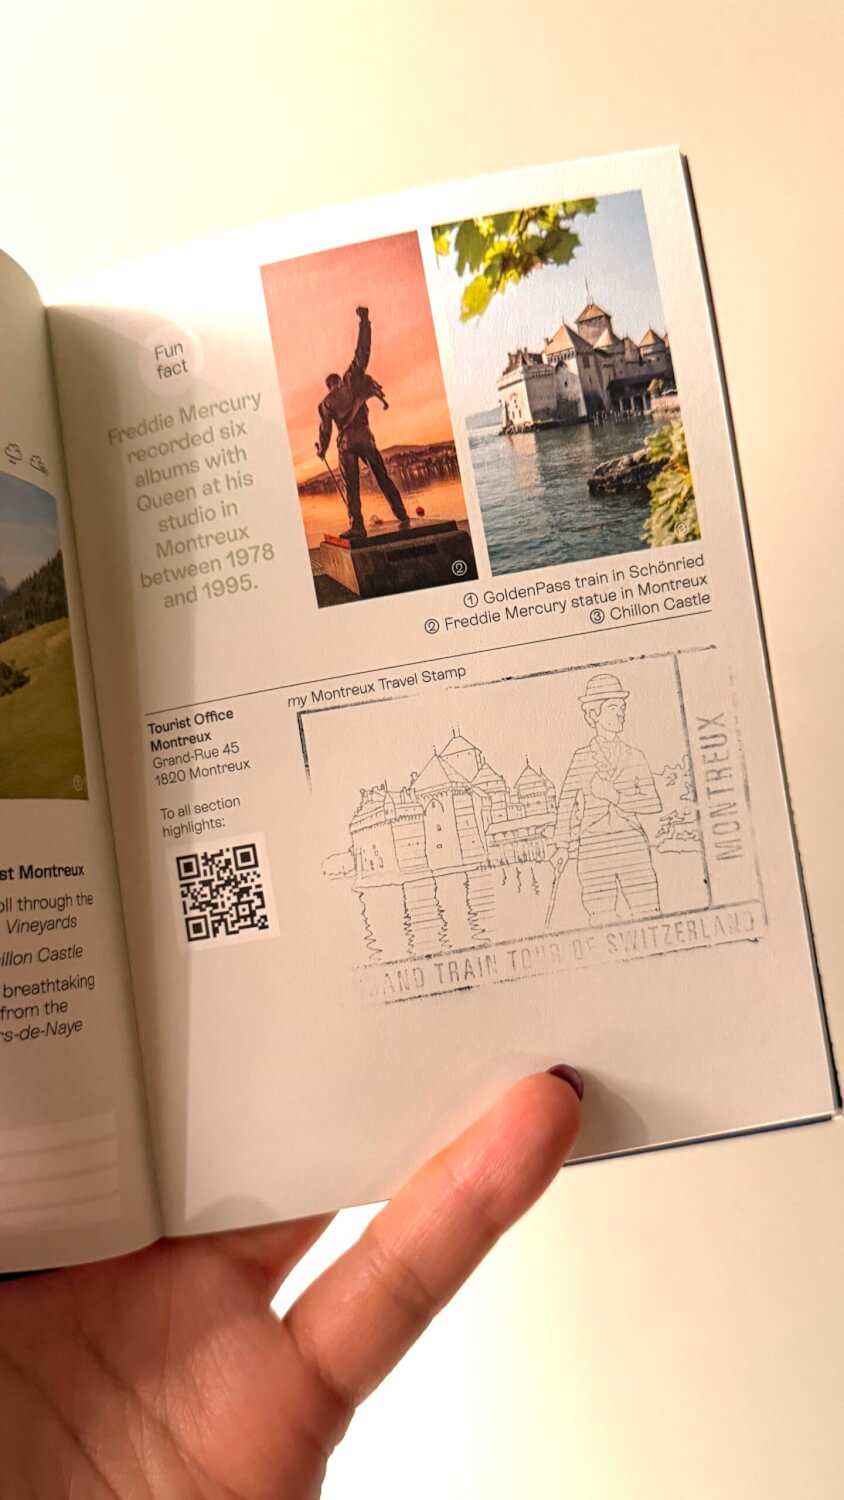
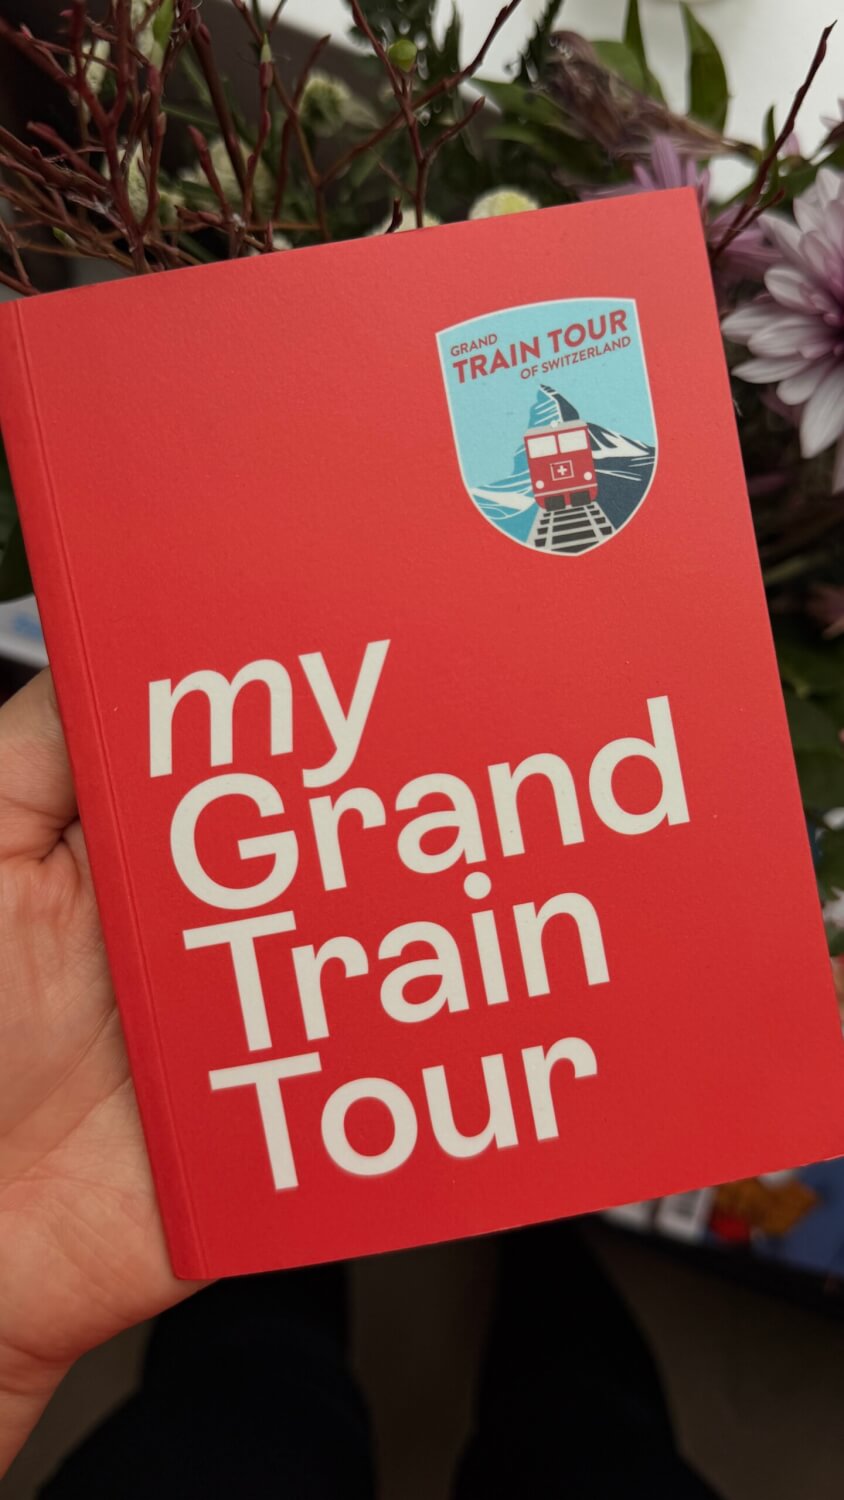
Also just a quick FYI for my fellow nerds: if you plan to take trains along the Grand Train Tour of Switzerland, the best free souvenir ever is this little train tour passport/booklet that you can get stamped at select stations or tourist info centres. There’s also a digital version on the Train Tour app (but I think that’s less fun). Click here for more info on where to find them.
Step Five: Get to the Platform
Platform numbers will generally be very well marked so just look up for signs before making your way.
There are generally no fare gates at train stations in Switzerland, so you just find your platform and go – nobody will check your tickets at this point, and instead there will be controls on the train once it’s running instead.
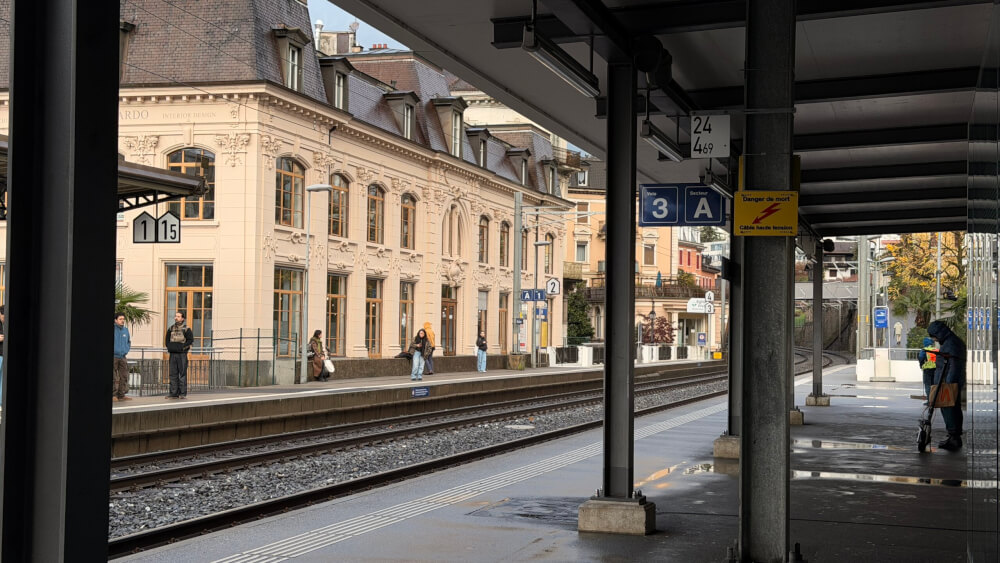
When you get onto your platform, double check it’s correct by confirming either on a screen or on the side of the train that you’re in the right place.
Step Six: Find Your Carriage
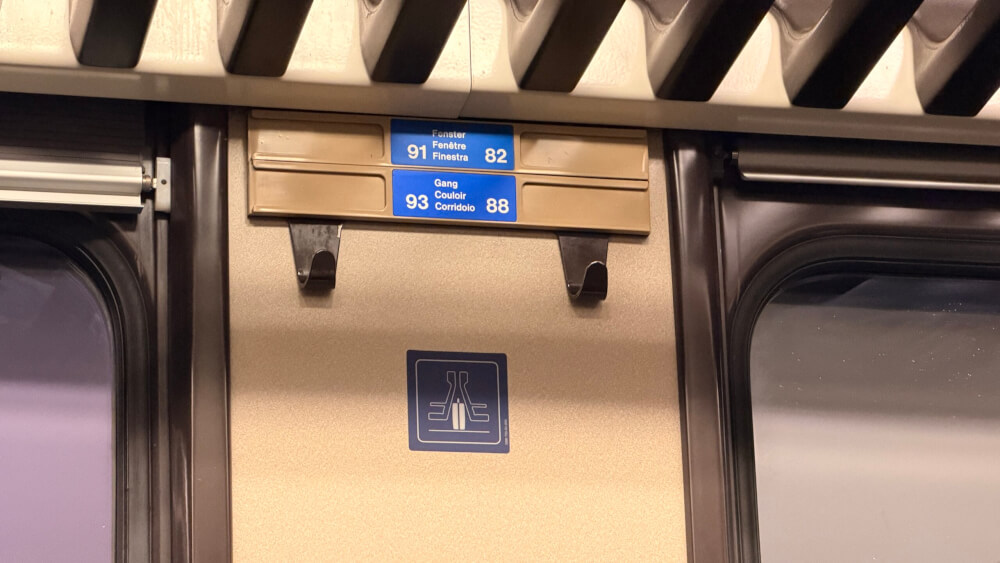
Whether you’re looking for a specific carriage number or just the right class, or even the dining car, look up at the electronic signs and there will usually be a little graphic on the bottom that shows you the class number of the carriage and carriage number, relative to a letter.
These letters mark different points of the platform, so if you see that 2nd class is from C-E for instance, you can walk over to that part of the platform to ensure you’re roughly in the right place when the train arrives.
This is helpful because some trains are really long, so if you can figure out where to stand in preparation, your life will be way easier.
If you do not have an assigned seat, then you simply need to board a carriage in the right class, then pick a free seat at your own leisure.
While the exact offerings will depend on the train you’re on, there are some fun unique carraiges to potentially keep an eye out for, or avoid depending on what you want.
Some special ones include…
- Family coaches with play areas
- Photography carriages like the ones I experienced on the RhB where you can open the windows more easily
- Quiet Zones
Finally, do remember to double-check whether the carriage number IS going to your intended location because some trains will split and go off on separate directions.
These are rare, but you may encounter them along popular routes like from Interlaken to Lauterbrunnen or Grindelwald they are usually marked with a special symbol and warning saying “Train with multiple destinations: Pls. observe indications on coaches”, so yes, if you see this on your route, allow some extra time to double check you get on the right coach, or when in doubt ask a conductor.
If you don’t have a reserved seat then usually, I find the farther you walk, the emptier the carriages will be.
Once you find or choose your carriage, then it’s time to hop on board.
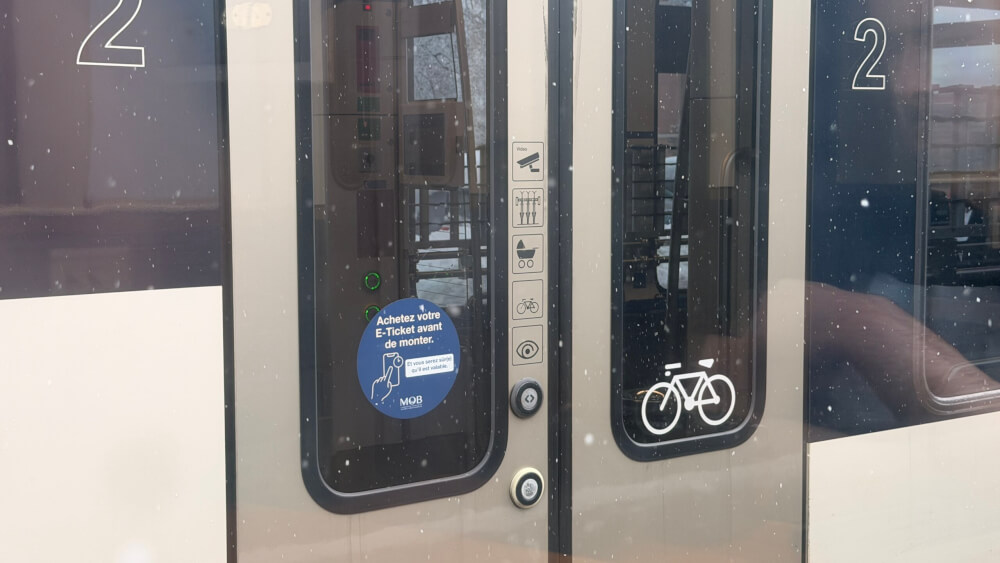
If the door isn’t opening then look for a button like this (<>) and press it. This goes for the train doors as well as carriage doors.
Now it’s time for…
Step Seven: Find Your Seat
First off, if your seat is assigned, try to make sure you go in through the correct door.
As you’re walking, look through the glass to see which end your seat will be so that you don’t have to squeeze past people coming from the other door.
If you have large bags, keep an eye out for large luggage racks when you enter. These will usually be found on the ends of the trains. With a carry-on, there is usually space above your seat for it.
Of course, this doesn’t apply to all trains.
Sometimes regional or suburban trains meant for short distances will NOT have special areas or compartments for luggage.
In these cases, for shorter journeys, I sometimes find it more comfortable to simply stand in between train carriages so I don’t have to worry about trying to find space for my luggage.
For regional trains, often the over top racks don’t have enough space for a carry on suitcase. The best place for these is usually in between back to back seats – this way no lifting is involved either.
Before sitting down, make sure your seat isn’t reserved and make sure you’re not taking up a priority space if the train is looking full.
Now, onto the fun stuff…
Step Eight: Get Comfortable and Enjoy the Journey!
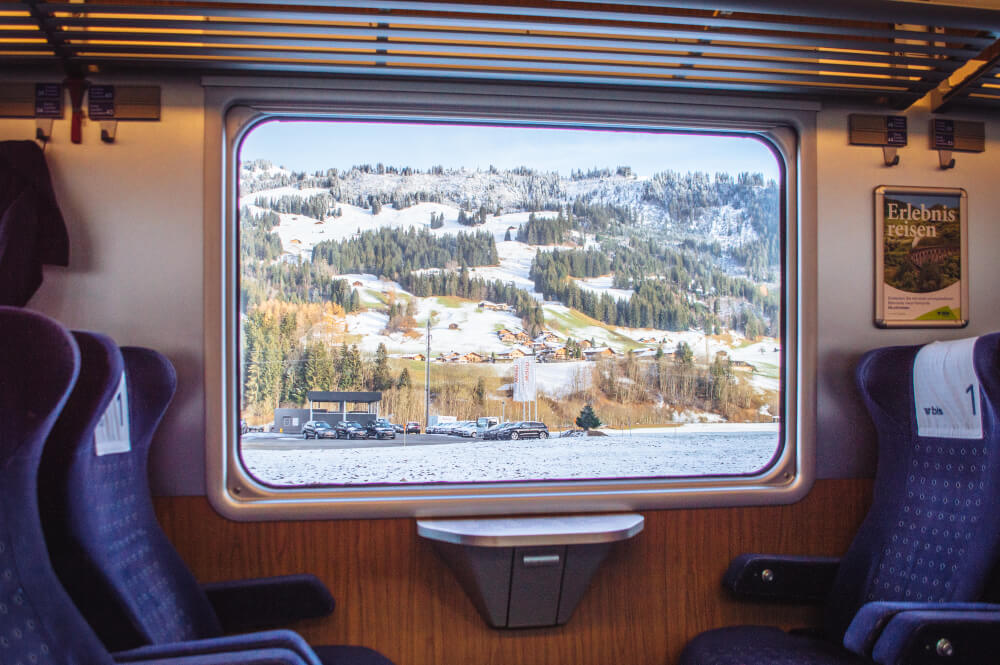
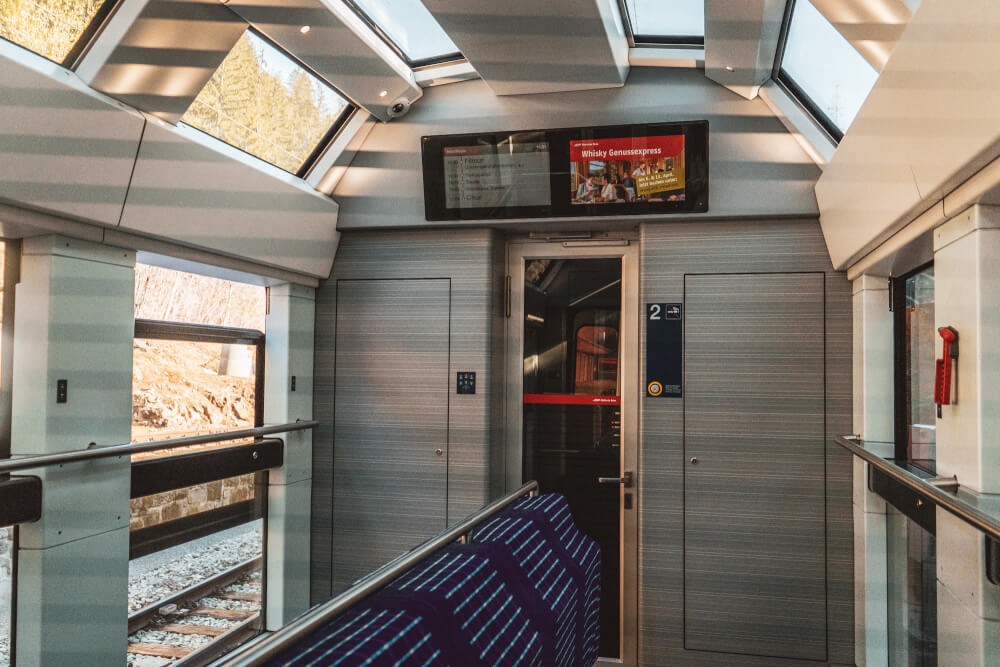
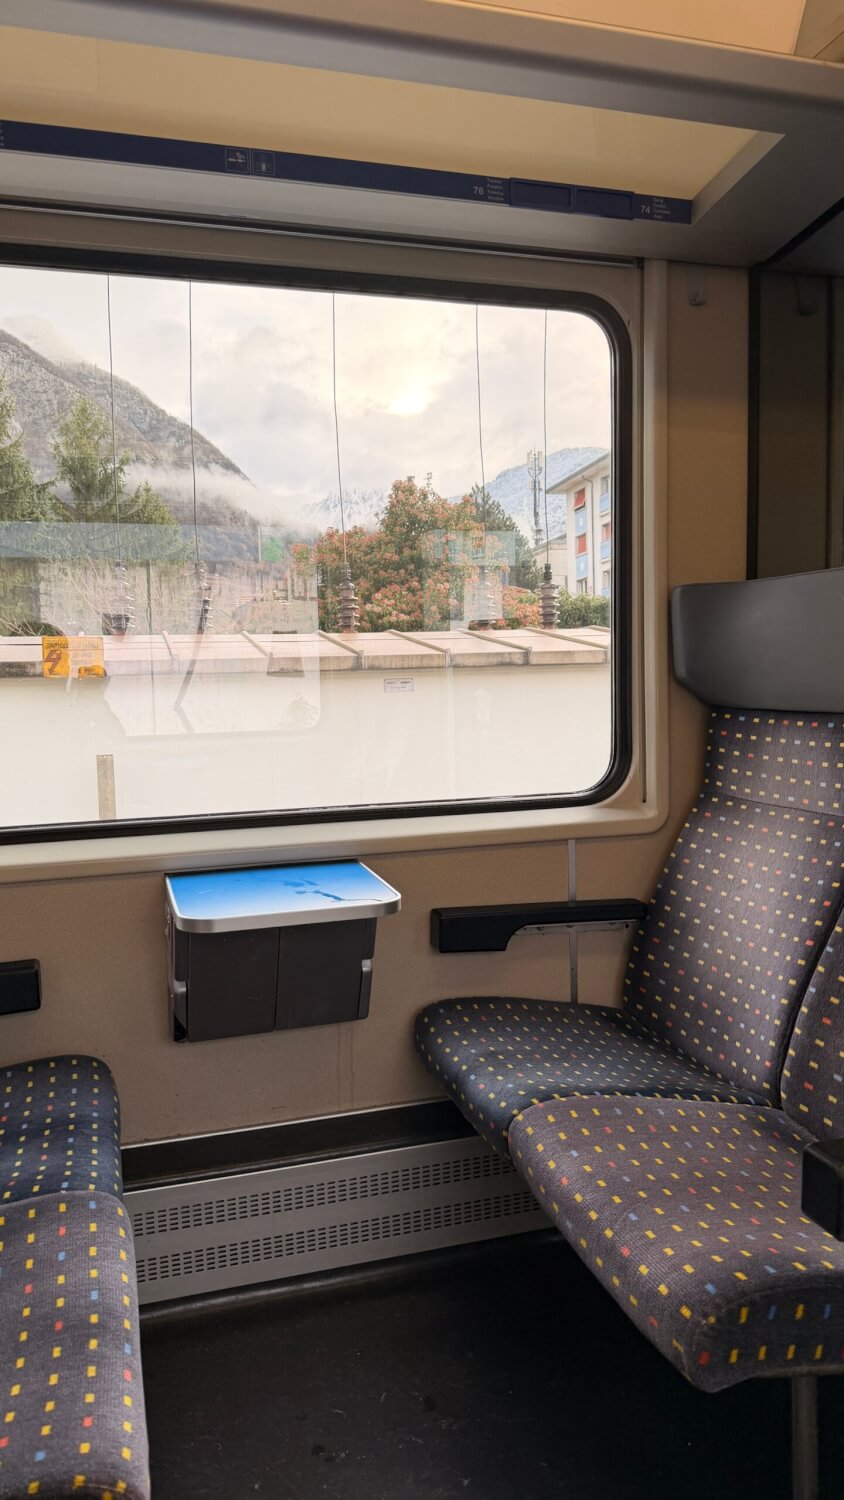
On longer distance trains, there’s often outlets, a fold out table, hooks to put your coat up, etc… though WiFi is rare unless you’re on one of the special tourist-oriented panoramic trains.
Longer distance trains may have additional amenities like an SBB Bistro or SBB Restaurant so be sure to take advantage.
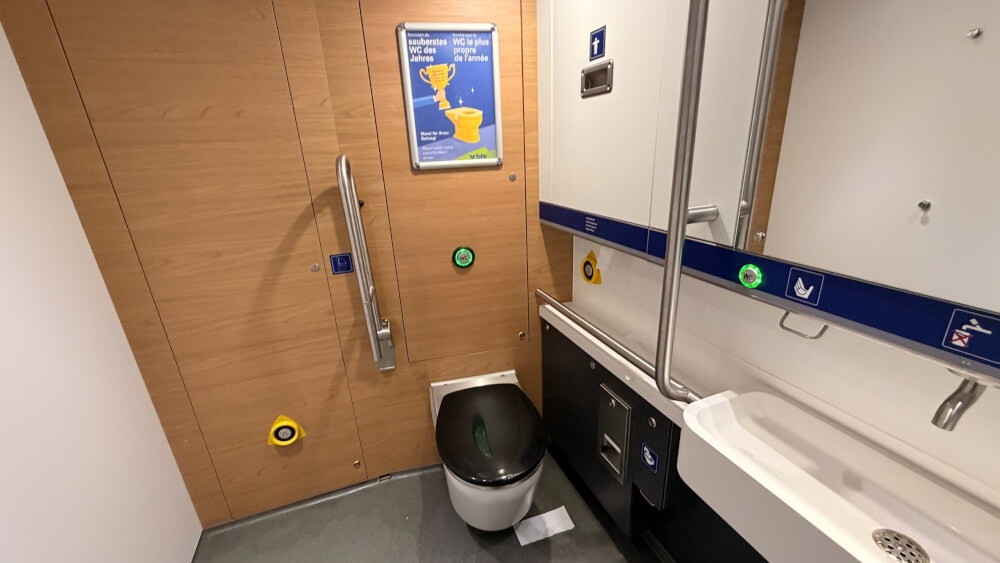
Of course, keep an eye out for the WC symbol to find the nearest on board toilet (but make sure to bring any valuables with you just in case).
Lastly, while it’s important to get comfy, remember to keep your ticket handy in case controllers come on board. They pretty much always check for longer distance trains, and I’d say random checks on local transport happen about 60% of the time.
Now, after your journey is complete, it’s onto…
Step Nine: Disembark
If you are not getting off at the end destination, then start prepping for disembarkation about 10 min before your arrival time. This gives you plenty of time to gather your belongings and bags in a rational, non-crazed manner.
To keep track of what time you’ll be arriving, keep an eye out for screens that show the scheduled arrival time/estimated arrival time.
Most modern trains will have these, but some older ones may not. In a pinch, you can always open up Google Maps to see where you are, so you can roughly estimate how much longer you have to go.
SPECIAL NOTE: Some smaller stops are known as ’Stops on request’ or request stops. These are stops that are only made if one requests it. For bigger cities, these won’t be an issue but if you’re staying somewhere farther out, it’s best to double check yours isn’t a request stop or you may be in trouble! Often these are marked with an x on the timetable, or will show the phrase “Halt auf Verlangen” (“request stop”) on the train screens.
To make this stop request, look for a button usually under the departure screen, or ask staff for help when in doubt.
Upon arrival, if the door isn’t opening then again look for a button with the <> open symbol.
Once the doors are open, be careful getting off the train as there’s often a gap/step.
To navigate your way off the platform and onwards to wherever you need to go, keep an eye out for signs that will point you in the right direction.
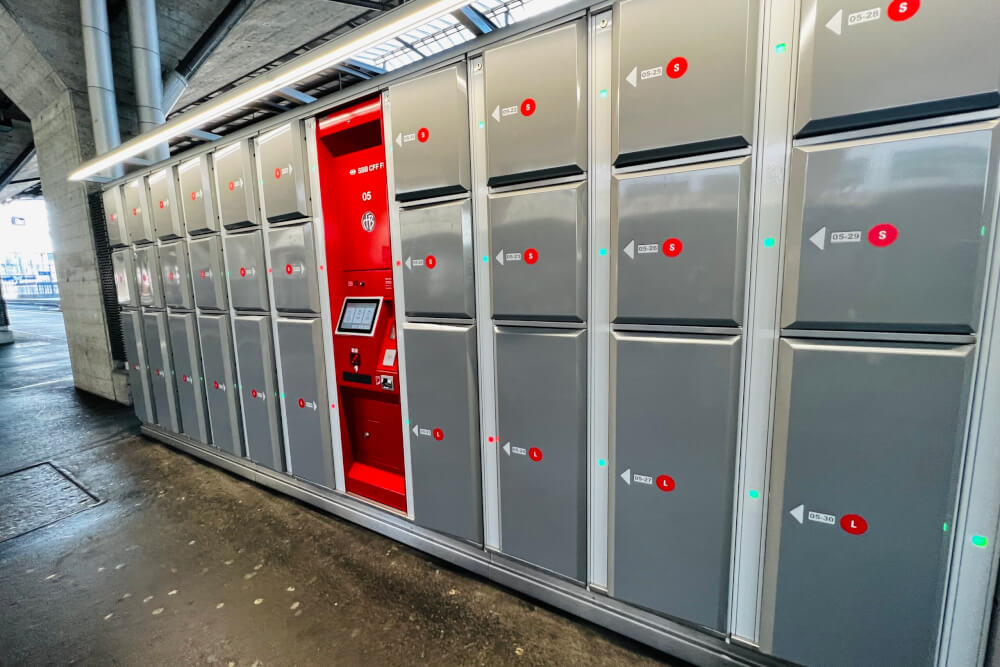
If you need a place to drop off your bags while you explore, most major train stations will have a paid left luggage area with lockers.
This is a great option if you’re too early to check in to your accommodation, or just dropping in for the day.
Lastly, remember that your train ticket is usually only valid for that specific train you boarded, so unless you bought a special ticket or City Pass, you won’t be able to use it for onward travel on the metro or bus.
Do note that many major cities offer guest cards with free public transport if you stay overnight though, so check with your accommodation if this is provided. If so, they can usually send you a digital version in advance so you can use it right away when you arrive.
NOTE: If your train is delayed, then depending on the rail company, you may be eligible for compensation! Simply search up “your rail company + late train compensation” to see if there are any options that apply to you. With SBB, for instance…
- For a delay of 60 minutes or more, you will receive 25% of the ticket price in compensation
- For a delay of 120 minutes or more, you will receive 50% of the ticket price in compensation
- Compensation amounts of under CHF 5 are not paid out
I Hope This Step by Step Guide on Taking Trains in Switzerland was Helpful!
Let me know in the comments if you have any more questions.