*FYI - this post may contain affiliate links, which means we earn a commission at no extra cost to you if you purchase from them. Also, as an Amazon Associate I earn from qualifying purchases. Check out our Privacy Policy and Disclosure. for more info.
In keeping with the theme of console cakes for my boyfriend’s birthday, this past year I decided to make him a Nintendo 64 cake. This was the console we both grew up on (holla 90s children!) and as a verbally abusive Mario Kart enthusiast (and proud Hylian Shield owner), tackling Nintendo seemed to make a lot of sense.
This year though, I wanted to kick things up a notch. That’s when I decided that every part of this birthday gift was going to be tied to the N64 theme. After a bit of brainstorming, I had a major lightbulb moment… I was going to make an Nintendo 64 cake, complete with a controller-shaped card and a gift wrapped as a game cartridge, plugged right into the cake.
Dayum that’s genius.
Curious about how I did it? I outline my methods below! (NOTE: I made this cake last year without any intention of blogging about it, so this tutorial lacks photos and is not super in-depth. I do assure you it’s easy though, and will be happy to answer any questions in the comments!)
Pin for later:
What you’ll need:
For the cake…
A cake recipe (my go-to is here)
Black fondant
A very small amount of white fondant (I make my own. Recipe here)
For the card and gift…
Cardstock
1. The Cake
The key to this cake is to do well on the carving bit. While the N64 is pretty much shaped like a flat sheet cake, there are lots of small details and curved edges that make it identifiable as what it is. If you have a real one, study it before you break out the carving knife. I literally had my old N64 on the counter with me so I could run over and look at details.
Now, let’s get started! Your first step is to bake up two 9×13 sheet cakes!

After you let them cool, ice the top of your bottom cake and stack them. I’m not a very adventurous person, so I opted for the classic chocolate cake + chocolate frosting combo. At this point, don’t frost the whole cake as you still have the crucial carving step to conquer:

Carve away with your serrated knife until you have the shape down. Most notably, ensure that you have the dipped lower section in the back, and the raised hill part in the front. After the shape is ready, frost the rest of that cake!
The next step is the fondant covering. Now, because N64s are black, I highly recommend using fondant, because you will get the sleek and polished look that your console cake deserves! While some argue that fondant doesn’t taste the best, it really does elevate your cake’s look. For ease of mind, just buy some black fondant from a cake supply store, as achieving this dark shade is nearly impossible on your own. Roll it out nice and thin with a rolling pin, then transfer it to your cake. Wilton has a nice tutorial on how to do that here. Ensure that you smooth the fondant down to match the shape you carved – that way your N64 will have that nice definition to it!
With the bulk of the work out of the way, now it’s time to focus on details!
- I used the leftover black fondant to make the controller ports, then painted them with a pearl dust + vodka mixture to make them silver/grey
- I used a sharp knife to cut the rectangular shape of the front memory expansion compartment
- I used my thumb to make an indent where the On/Reset buttons were, then cut out black fondant ovals and put them on
Details really enhance the cake, so have fun with it! Don’t worry too much about making your n64 100% faithful to the real deal – nobody will be looking that closely.
2. The Gift
With the cake out of the way, creating the game cartridge wrapping is the next step. This part is surprisingly not that difficult! Of course, the gift has to be something that fits into a small, flat box, so things like wallets, money clips, jewelry or gift cards are ideal. Luckily, I had already purchased his gift for the year (a money clip from Hugo Boss), so the box was a perfect size. The following are some instructions on how to wrap your gift like a N64 cartridge. NOTE: The diagram below is not a printable template, it is only a visual aid! Because box sizes will vary, there is no one-size-fits-all template that I can provide.
1. Place your gift box down on some cardstock. Cut out a piece of cardboard that looks like the diagram above, leaving some space between the edge of your box and the edge of your cutout. Keep in mind that N64 games are shaped like rectangles with an arch up top. For the middle bar between the two sides, ensure that it is WIDER than the height of your box. Also ensure that all the spots marked “xcm” are the same length! To help you out, once folded, this cutout will look just like a taco shell. Make sure that your gift box will fit nicely in this taco shell.
2. Cut out this piece along the solid black lines.
3. Fold along the dotted lines.
4. Notice those two tabs sticking out from the side? Fold them along the dotted lines and glue the tab onto the other side. After you glue both tabs on, your taco shell’s sides should be closed up, leaving only the top open.
5. Place your gift box into your taco shell.
6. Cut out a long strip of cardboard whose WIDTH = xcm (the same width as the center strip of your taco shell.
7. Glue one side of this strip onto the side of your box, like in the diagram below. Then, bend this strip to meet the arc shape of the cartridge and glue the remainder into the other side. Your box should now be completely sealed up! You can also hot glue along the edge to get it all sealed perfectly, but this isn’t mandatory.

8. As a finishing touch, make your own drawing for the front of the cartridge and glue it on. For mine, I coloured my cartridge gold and drew a little Happy Birthday drawing.
9. Cut a slot in your cake that corresponds to the size of your new cartridge, then stick it right in there! Piece of cake 🙂 Literally.
3. The Card
Last but not least is the card. For me, this was the easiest part. I am usually an advocate for hand-drawn cards, but I ran out of time so I opted for a much easier solution.
I simply printed out a photo of a N64 controller and pasted it on some cardboard and cut it out. Simple, but effective. After all, it’s the content that matters most! Make ’em cry, people.
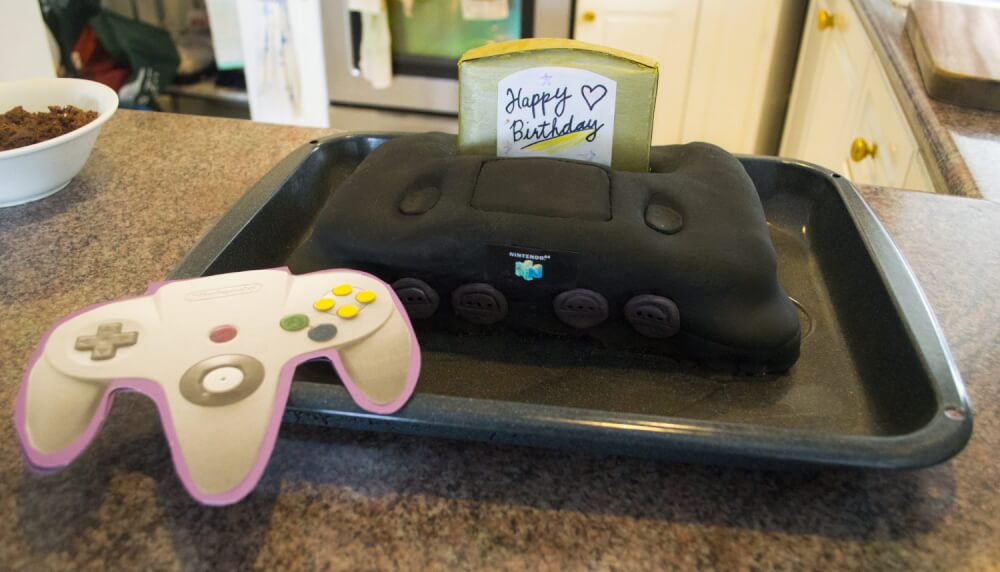
So, overall, the cake turned out just as I had hoped! … now which console should I tackle next? Let me know in the comments!